
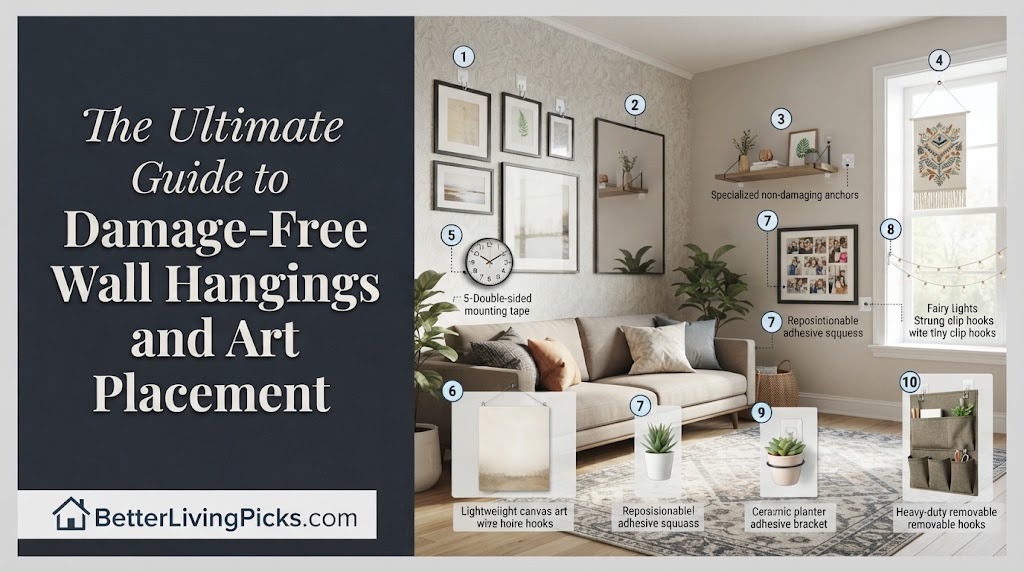
Using heavy-duty adhesive strips or micro-pin picture hangers allows you to mount lightweight to medium frames securely while leaving your drywall entirely intact and smooth.
2. How much weight can adhesive hanging strips actually hold?
Standard strips hold up to four pounds per pair, while large heavy-duty options can support up to sixteen pounds if you apply them to a properly cleaned surface.
3. Why do sticky picture strips sometimes pull off paint?
Pulling the release tab straight out instead of stretching it slowly downward against the wall causes the adhesive to lock onto the paint layer and rip it away.
4. Can you hang heavy mirrors without using a wall stud?
Hanging heavy mirrors without a stud requires specialized drywall toggle anchors or distributing the load across multiple mechanical wall hooks to prevent catastrophic failure.
Hanging artwork and family photos used to mean pulling out a heavy toolbox, dealing with messy plastic anchors, and spending hours patching drywall holes when moving out. Renters and homeowners alike waste countless weekends measuring, hammering, and stressing over crooked frames that leave permanent scars on clean painted walls.
This comprehensive guide breaks down everything you need to know about secure, professional-grade damage-free wall hangings. You will learn how to choose the right adhesive or pin system, prep your walls for maximum grip, and arrange your favorite gallery pieces with total confidence.
Command Large Picture Hanging Strips provide the best balance of holding strength and clean removal, safely supporting up to sixteen pounds per set when paired with a clean wall surface.
Why Traditional Wall Hanging Fails Renters and Homeowners

Traditional nails and screws feel reliable until you try to remove them or rearrange your living room layout. Every time you drive a steel nail into drywall, you create a crumbling hole that requires spackle, putty, sanding, and touch-up paint.
Renters face steep security deposit deductions for unauthorized drill marks, while homeowners grow tired of endless weekend wall repairs. Moving beyond standard hardware protects your interior finishes and gives you the freedom to update your home decor whenever inspiration strikes.
The Hidden Costs of Drywall Anchors and Large Nails
Plastic drywall anchors expand behind the wall board to hold heavy loads, but they tear massive holes when removed. Patching these craters takes hours because you have to wait for joint compound to dry completely before painting over the spot.
If you miss a step, the patch shrinks, cracks, or shows through your fresh coat of paint. Skipping drills and hammers altogether eliminates this tedious maintenance cycle and keeps your walls looking factory-smooth.
Understanding Weight Limits Before You Stick or Hammer
Every hanging tool has a strict weight capacity rated by the manufacturer for ideal laboratory conditions. Real-world humidity, dust, and uneven frame depths reduce those maximum limits by at least twenty percent.
Weigh your framed art on a kitchen scale before selecting your hardware to avoid midnight crashing noises. Choosing a slightly higher weight rating than your frame requires provides a safe margin of error.
The Complete Arsenal of Damage-Free Hanging Tools
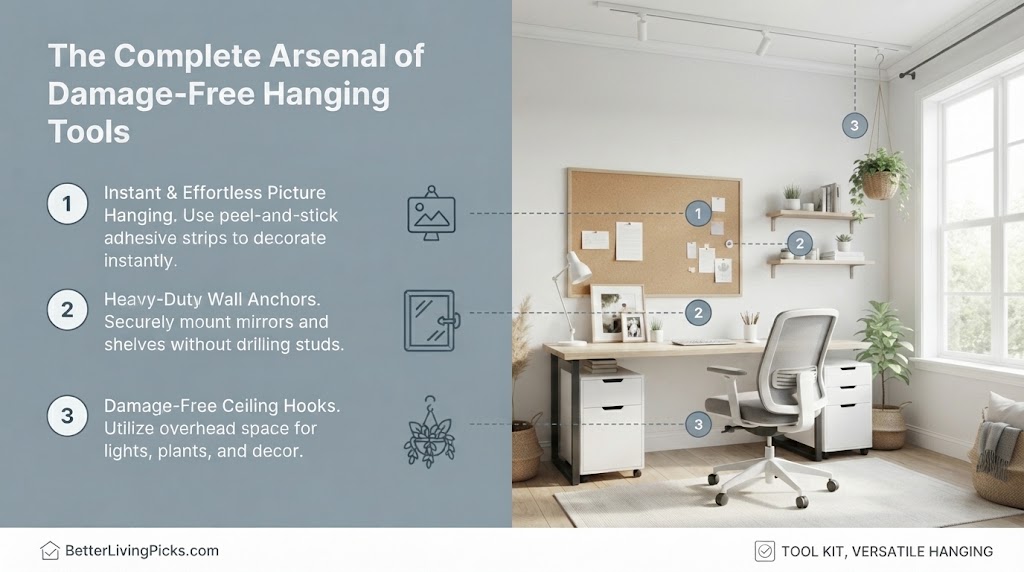
Modern hardware stores offer incredible alternatives to traditional nails that cater to every frame style and wall surface. Knowing which tool fits your specific project saves you from wasted materials and damaged picture frames.
Adhesive Strips and Hooks: The Gold Standard for Light Art
Adhesive hook and loop strips lock together firmly while distributing tension evenly across the back of wooden or metal frames. They install in seconds without tools and peel away cleanly when you are ready to change your display.
These strips work best on flat painted drywall, smooth wood paneling, and finished glass surfaces. They keep your frames sitting completely flush against the wall without tilting forward.
Specialized Picture-Hanging Wire Hooks and Micro-Pins
When adhesive strips will not stick to textured paint, ultra-thin steel micro-pins offer a brilliant alternative. These tiny angled pins slide into drywall like sewing needles, leaving microscopic holes that disappear under a dab of toothpaste or touch-up paint.
They provide the secure mechanical bite of a nail without the destructive gaping hole. This makes them ideal for heavier canvas prints and decorative wooden plaques.
Tension Rods and Leaner Frames as No-Drill Workarounds
If you want zero wall contact altogether, leaning heavy oversized art on credenzas or utilizing floor-to-ceiling tension rods creates an instant designer look. Leaner frames add wonderful dimension and depth to empty corners without any installation hassle.
Tension rods placed inside alcoves or bookshelves let you hang trailing plants and lightweight frames effortlessly. This approach works exceptionally well in historic apartments with fragile plaster walls.
Understanding Pressure-Sensitive Adhesives

To truly master damage-free hanging, it helps to understand the physics happening behind the plastic strip. Pressure-sensitive adhesives rely on a unique blend of elasticity and permanent tackiness to maintain a lifelong grip on your walls.
Viscoelastic Polymers and Their Reaction to Load Stress
The foam core inside damage-free hanging strips consists of viscoelastic polymers that act like a solid and a liquid simultaneously. When you press the strip against the wall, the polymer flows into microscopic valleys and pores of the paint.
This molecular interlock creates massive surface area contact. Over time, the polymer absorbs shocks from doors slamming or footsteps without letting go.
The Science of Shear Force Versus Tensile Pull Strength
Adhesives perform exceptionally well under shear force, which is the downward gravity load parallel to the wall surface. However, they fail quickly under tensile pull strength, which is any force pulling straight outward away from the wall.
This physical reality is why picture hanging strips use vertical interlocking teeth. They convert outward pull stress safely into downward shear weight.
Environmental Degradation Factors: Heat, Moisture, and Oxidation
Temperature swings cause building materials and adhesive polymers to expand and contract at different rates. High indoor humidity softens acrylic foam cores, while excessive heat accelerates chemical oxidation.
Controlling these environmental factors inside your home protects your adhesive bonds from premature structural breakdown. Selecting room-appropriate hardware guarantees long-term success.
Step-by-Step Guide to Surface Prep for Maximum Adhesion

Even the strongest adhesive strips will fail instantly if applied over microscopic dust, grease, or fresh paint fumes. Proper surface preparation is the single most important factor in keeping your wall art securely mounted for years.
Cleaning Wall Surfaces with Isopropyl Alcohol to Remove Invisible Oils
Wipe down your chosen wall spot using isopropyl alcohol on a clean microfiber cloth to strip away invisible oils and household dust. Let the area dry completely for at least ten minutes before pressing any adhesive to the paint.
Never use standard household multi-purpose sprays because they leave behind waxy residue that blocks adhesive bonding agents. Taking two extra minutes to clean your walls prevents costly frame crashes.
Temperature and Humidity Thresholds You Must Control
Temperature fluctuations drastically affect how well pressure-sensitive adhesives grip onto indoor wall surfaces. Ideal application temperature ranges between 50°F and 80°F for optimal chemical bonding.
Cold winter walls cause the adhesive foam to stiffen and lose tackiness immediately upon contact. Warming the wall surface gently with a hair dryer before application ensures a rock-solid hold.
Eco-Friendly and Sustainable Removal Practices

Disposing of renovation and interior decorating waste responsibly involves separating metal hooks from plastic polymer backings before throwing them away. Standard synthetic foam pads do not break down in municipal landfills, making proper material sorting essential for minimizing your household environmental footprint.
Utilizing biodegradable citrus-based adhesive removers instead of harsh chemical petroleum solvents protects indoor air quality and prevents toxic runoff. These natural alternatives break down stubborn foam residue effectively while keeping your home workspace safe, clean, and sustainable.
Smart Sensor Integration and Digital Frame Mounting

Mounting smart home control panels and digital picture frames introduces unique electrical and weight distribution challenges. Continuous power cords exert subtle downward tension on adhesive strips, which can cause premature failure if your mounting hardware rating is marginal.
Digital displays also generate internal heat during prolonged operation, potentially affecting the thermal stability of nearby adhesive bonds. Always verify that ventilation ports remain unblocked and that power cables are safely secured with specialized clips rather than hanging loose.
Seasonal Climate Adaptation for Adhesive Durability

Indoor wall substrates expand and contract significantly as seasonal temperatures shift from freezing winters to humid summers. These microscopic substrate movements place continuous shear stress on pressure-sensitive adhesive bonds, increasing the risk of sudden frame detachment.
Homes lacking central climate control require extra vigilance to protect interior displays from extreme thermal fluctuations. Inspecting your heaviest wall hangings biannually during equinox transitions allows you to reinforce aging strips before environmental degradation causes a failure.
Hanging Lightweight Frames, Posters, and Canvas Prints Safely

Lightweight frames under five pounds are the easiest items to mount using standard adhesive tape and small hanging clips. Perfect alignment ensures your gallery wall looks professional rather than haphazard.
Precision Leveling and Alignment Techniques for First-Time Success
Press one pair of adhesive strips onto the back of your frame first, leaving the protective paper liner on the wall-facing side. Hold your frame against the wall, check the built-in bubble level, and press firmly against the top corners.
Remove the frame gently, then press hard along every strip for thirty seconds to activate the pressure-sensitive adhesive. This fool-proof method guarantees your frame matches your pencil marks every single time.
Step-by-Step Removal Protocols to Preserve Rental Paint Finishes
Pulling frames straight off the wall will tear your drywall paper and ruin your paint finish instantly. Instead, grab the exposed plastic pull tab at the bottom of the strip and stretch it slowly straight down along the wall.
Keep pulling downwards until the elastic strip releases its grip with a gentle pop. Never pull the tab outward away from the wall surface during removal.
Hanging Lightweight Frames and Canvas Prints Safely
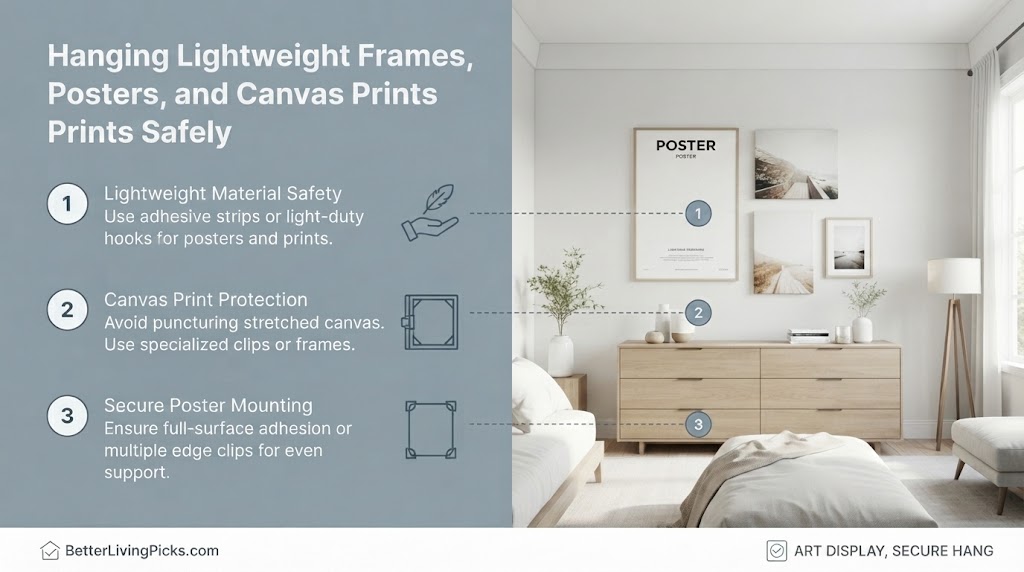
Lightweight frames under five pounds are the easiest items to mount using standard adhesive tape and small hanging clips. Perfect alignment ensures your gallery wall looks professional rather than haphazard.
Aligning and Leveling Multiple Strips on the First Try
Press one pair of adhesive strips onto the back of your frame first, leaving the protective paper liner on the wall-facing side. Hold your frame against the wall, check the built-in bubble level, and press firmly against the top corners.
Remove the frame gently, then press hard along every strip for thirty seconds to activate the pressure-sensitive adhesive. This fool-proof method guarantees your frame matches your pencil marks every single time.
Removing Adhesive Strips Without Stripping Paint
Pulling frames straight off the wall will tear your drywall paper and ruin your paint finish instantly. Instead, grab the exposed plastic pull tab at the bottom of the strip and stretch it slowly straight down along the wall.
Keep pulling downwards until the elastic strip releases its grip with a gentle pop. Never pull the tab outward away from the wall surface during removal.
Engineering Solutions for Medium to Heavy Mirrors and Framed Art
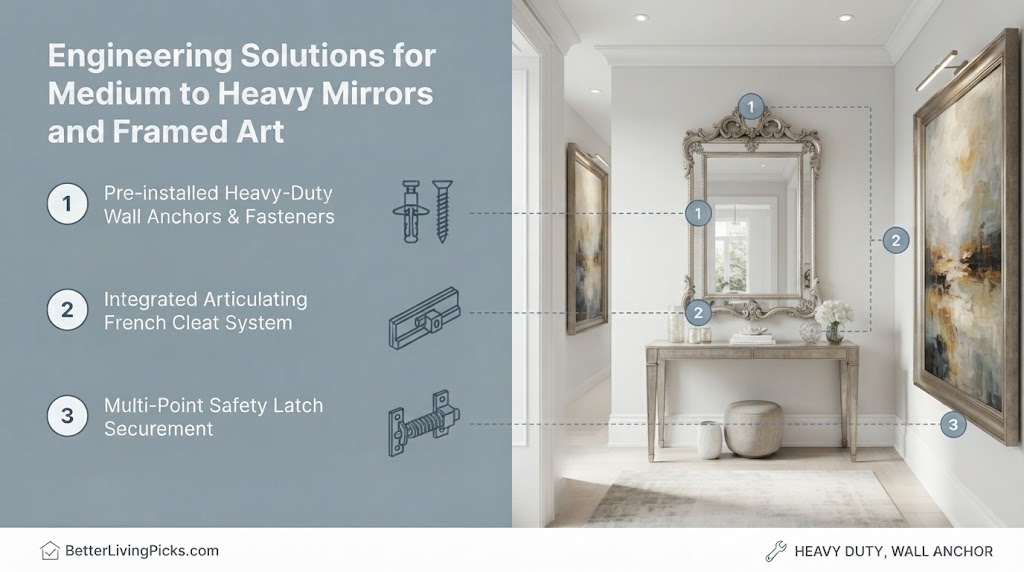
Heavy mirrors and thick wooden frames require robust mechanical support or heavy-duty industrial fastening systems. Combining multiple anchor points prevents twisting and keeps large decorative pieces secure.
Distributing Dynamic Load Across Multiple Bracket Points
Instead of relying on a single center hook, distribute heavy frame loads across two or three separate hanging brackets spaced evenly apart. This divides the total weight load and prevents single-point wall fatigue.
Using a sturdy hanging wire coupled with two wall hooks keeps your heavy mirror balanced and centered automatically. Always verify that your chosen brackets match the total weight of your framed display.
Utilizing Toggle Bolts and Heavy-Duty Hollow-Wall Anchors
When wall studs are unavailable, standard plastic anchors will pull straight out of drywall under heavy loads. Spring-loaded toggle bolts and threaded metal drywall anchors butterfly open behind the wall board to distribute pressure across a wide area.
This mechanical fastening approach provides exceptional security for large decorative mirrors. Always pre-drill your pilot holes carefully to prevent cracking the surrounding drywall surface.
Anti-Tilt Stabilization Tips for Large Wall Hangings
Large heavy frames tend to lean outward at the top, putting unnecessary strain on your upper fasteners. Adding small rubber bumpers or adhesive foam pads to the bottom back corners of the frame keeps it plumb and steady.
This simple trick prevents the frame from shifting when doors close or people walk past. It also protects your wall paint from scuff marks caused by swinging wood edges.
Advanced Gallery Wall Design Using No-Drill Frameworks

Creating a stunning gallery wall layout requires careful planning before you stick any hardware to your paint. Using no-drill systems gives you the freedom to experiment with different arrangements without committing to permanent holes.
Mapping Out Symmetric and Asymmetric Layouts Without Pencil Marks
Lay your framed pictures out on a large table or the floor first to test various spacing arrangements. Take a photo with your phone to compare different gallery configurations before touching the wall.
Using painter’s tape on the wall helps outline your overall gallery boundaries without leaving sticky residue behind. This visual preview guarantees a balanced final display.
Mixing Leaner Frames with Floating Shelves and Plant Hooks
Combine traditional hanging strips with floating wall ledges to create depth and dimension in your display. Leaner frames layered against each other look modern and intentional without requiring individual wall mounts for every piece.
Hanging trailing pothos plants from tension rods or lightweight ceiling hooks adds organic texture to your gallery wall. This blended approach transforms plain hallways into high-end designer spaces.
Common Mistakes That Cause Frame Failures and How to Fix Them

Most wall hanging failures happen because of rushed installations, skipping prep steps, or ignoring weight ratings. Recognizing these common errors helps you protect your valuable artwork and investment pieces.
Diagnosing Overloaded Capacities and Substrate Failures
Loading a ten-pound frame onto strips rated for only four pounds is a recipe for disaster. Always check manufacturer packaging labels and round up your frame weight calculation for safety.
Avoid placing adhesive strips on porous brick, rough stucco, or loose wallpaper where the backing substrate can detach easily. Stick to smooth painted drywall for maximum long-term reliability.
Correcting Premature Loading and Insufficient Curing Mistakes
Many people hang heavy frames immediately after pressing adhesive strips to the wall, leading to premature slips. Adhesives need time to flow into microscopic pores of the paint and build full structural strength.
Wait at least one full hour after pressing your strips before mounting the frame weight onto them. For heavy-duty industrial fasteners, waiting twenty-four hours ensures maximum bonding power.
Dealing with Humidity and Steam in Bathrooms and Kitchens
Kitchen grease and bathroom steam can infiltrate adhesive bonds and break down chemical polymers over time. Always use moisture-resistant or outdoor-rated adhesive options in high-humidity zones.
Wiping down tile or semi-gloss painted bathroom walls with isopropyl alcohol before mounting prevents steam from sliding your frames off the wall. Inspect your bathroom displays periodically to catch minor shifts early.
Overloading Rated Capacities and Ignoring Surface Types
Loading a ten-pound frame onto strips rated for only four pounds is a recipe for disaster. Always check manufacturer packaging labels and round up your frame weight calculation for safety.
Avoid placing adhesive strips on porous brick, rough stucco, or loose wallpaper where the backing substrate can detach easily. Stick to smooth painted drywall for maximum long-term reliability.
Rushing the Curing Time After Pressing
Many people hang heavy frames immediately after pressing adhesive strips to the wall, leading to premature slips. Adhesives need time to flow into microscopic pores of the paint and build full structural strength.
Wait at least one full hour after pressing your strips before mounting the frame weight onto them. For heavy-duty industrial fasteners, waiting twenty-four hours ensures maximum bonding power.
- Clean with Alcohol: Always wipe wall surfaces with isopropyl alcohol to remove invisible dust and oils before applying adhesive strips.
- Respect Weight Limits: Weigh your framed art on a scale and choose hardware rated significantly higher than your actual frame weight.
- Master Safe Removal: Stretch adhesive tabs straight down along the wall surface to prevent peeling paint and drywall paper damage.
- Observe Curing Windows: Wait at least one full hour—or up to twenty-four hours for heavy items—before hanging frames on fresh adhesive.
Frequently Asked Questions
Can damage-free hanging strips be reused if I move them?
Adhesive strips lose their structural integrity and sticky backing once stretched or removed, meaning you cannot successfully reuse them. Always apply fresh new strips whenever you relocate your frames to ensure secure mounting.
Do command strips damage rental apartment walls upon removal?
Command strips leave rental walls completely undamaged as long as you follow proper removal techniques by stretching the pull tab straight down. Yanking the strips outward instead of downward is what causes paint peeling and surface damage.
What is the best way to hang art on brick or concrete walls?
Hanging art on brick or concrete requires masonry anchor screws or specialized brick clips that grip the mortar joints without drilling permanent holes. Adhesive strips will not bond reliably to porous, dusty masonry surfaces.
How do I get adhesive residue off the back of a wooden frame?
Rubbing a small amount of Goo Gone, rubbing alcohol, or warm soapy water onto the residual adhesive breaks down the sticky foam bond safely. Gently roll the softened residue off with your thumb without scratching the wood finish.
Can I use adhesive hanging strips in steamy bathrooms?
Standard adhesive strips fail in high-humidity bathrooms because moisture degrades the foam backing and adhesive compound over time. Water-resistant or bathroom-rated outdoor strips withstand steam and temperature changes much better.
Why do my picture frames keep tilting sideways on the wall?
Frames tilt sideways when weight is distributed unevenly or when only a single central adhesive strip is used. Placing two vertical strips near the bottom corners of the frame stabilizes the base and stops it from pivoting.
What alternative exists for hanging heavy framed art without studs?
Using toggle bolts or heavy-duty drywall anchors provides strong load-bearing capacity when wall studs are unavailable. These anchors butterfly open behind the drywall board to distribute weight safely across a wider surface area.
How long should I wait to hang art after painting my walls?
You must wait a minimum of thirty days for fresh latex wall paint to cure completely before applying any adhesive strips. Trapped gas fumes beneath fresh paint will dissolve the adhesive bond and cause your frame to fall.
Are micro-pin hangers strong enough for large glass frames?
Micro-pin hangers support moderate weights up to twenty pounds, making them suitable for many medium-sized glass frames. However, for oversized heavy mirrors, you should always secure your hardware directly into wood wall studs.
Can I hang heavy canvases using foam mounting tape from the dollar store?
Cheap generic foam tapes lack the high-density acrylic core required to hold heavy frame loads over long periods. Always invest in trusted, name-brand industrial fasteners to protect your valuable artwork from sudden crashes.
How do I prevent large mirrors from bowing forward over time?
Large heavy mirrors exert leverage that pulls the top fasteners away from the drywall surface. Using adjustable hanging wire paired with dual wall hooks distributes the forward tilting force evenly.
What is the safest way to remove stubborn mounting foam left on drywall?
Soak the residual foam with warm soapy water or a citrus-based adhesive remover for five minutes to dissolve the acrylic bond. Gently scrape the softened foam away using a plastic putty knife without gouging the paint layer.
Transforming Your Space With Absolute Confidence
Decorating your home should feel like an exciting creative journey rather than a stressful repair project. By choosing the right damage-free hanging tools, honoring weight limits, and prepping your surfaces correctly, you can showcase your favorite art securely and professionally. Enjoy transforming your walls with total peace of mind!

