
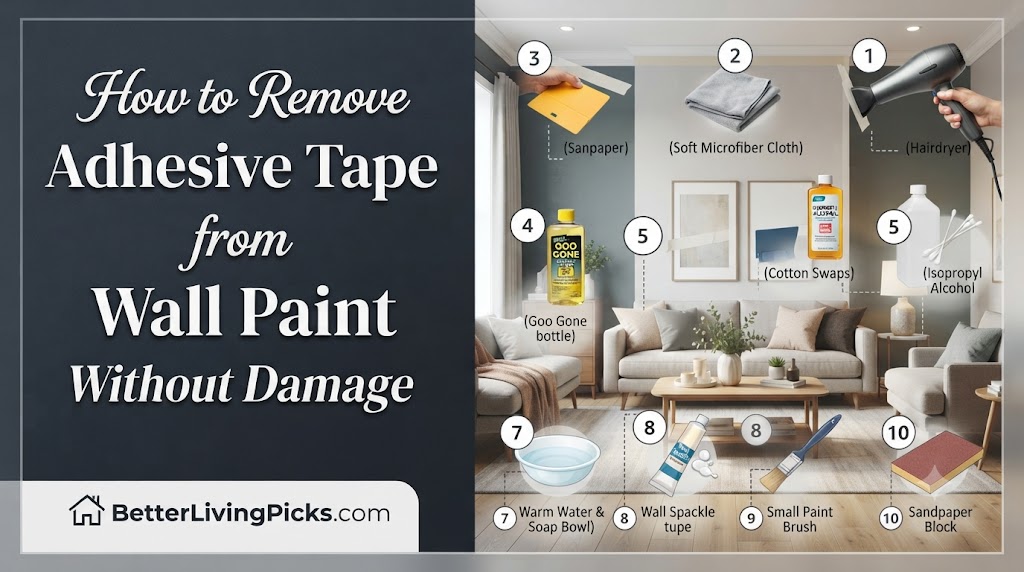
We have all been there. You pull down a poster, a piece of artwork, or some holiday decorations, only to hear that sickening sound of tape grabbing the paint layer and pulling it right off the drywall. It is a sinking feeling, especially when you are trying to get a security deposit back or just keep your home looking sharp. Many people make the mistake of just pulling harder when they hear that sound, which only leads to a larger, more expensive repair.
The good news is that you rarely have to repaint the entire wall. By changing how you approach the adhesive, you can break the bond between the tape and the paint before any damage occurs. Whether you are dealing with ancient, brittle masking tape or fresh, aggressive duct tape, the process is about patience and science. This guide will walk you through the exact, field-tested process to get that sticky mess off without leaving a mark behind.
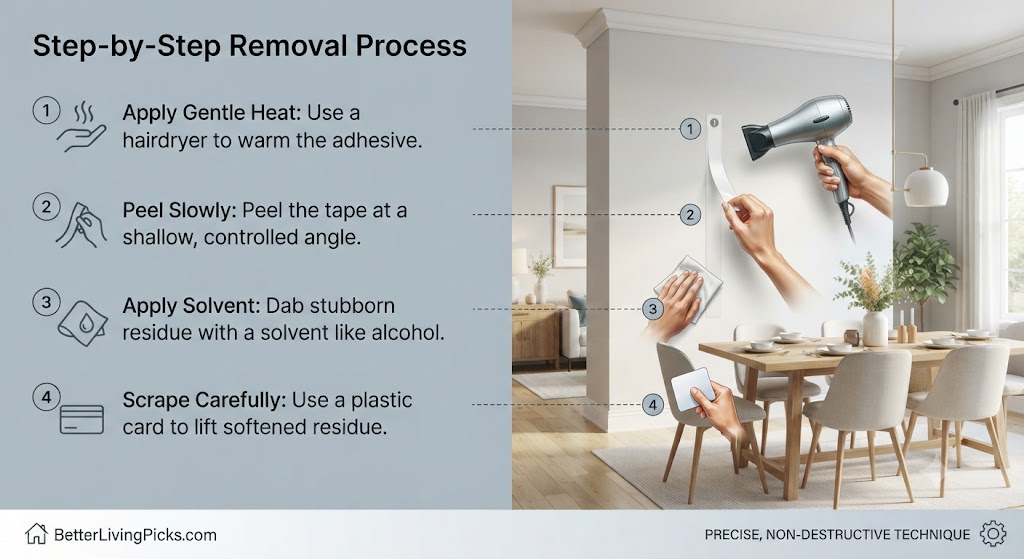
Always apply gentle heat with a hairdryer before peeling. Heat softens the adhesive bond, allowing the tape to lift cleanly without pulling the paint layer off the wall surface.
2. What is the safest way to remove sticky residue?
Use a mixture of warm water and mild dish soap for light residue. For tougher spots, use a small amount of isopropyl alcohol applied with a microfiber cloth.
3. Should I scrape the adhesive off?
Never use metal scrapers or hard blades. These will gouge your drywall or scratch the paint finish. Use a soft plastic edge or a microfiber cloth to gently rub away the adhesive.
4. What if the paint already peeled?
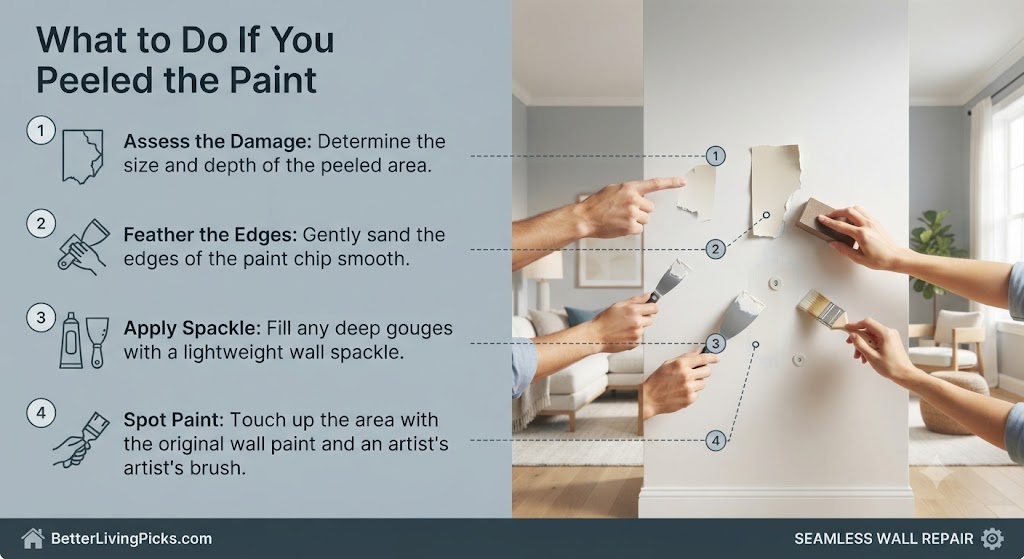
Do not panic. You can lightly sand the edges of the peeled area, apply a tiny bit of spackle if needed, and use a small brush to touch up the spot with leftover wall paint.
Understanding Your Wall Surface
The Chemistry of Paint and Adhesives
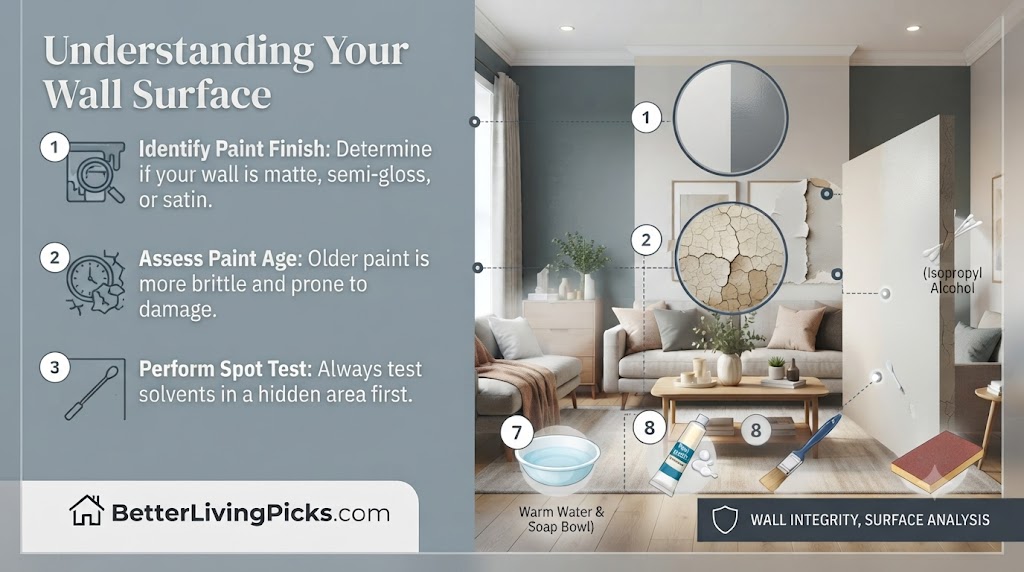
Paint is not just a coat of color; it is a polymer film that adheres to your drywall. When you apply tape, the adhesive on the back of the tape forms a bond with that film. Over time, or with heat, the adhesive can migrate into the microscopic pores of the paint. When you pull the tape, if the adhesive bond to the paint is stronger than the paint’s bond to the drywall primer, the paint will come with the tape. Understanding this helps you realize why “speed” is your enemy. You aren’t just removing tape; you are managing a chemical bond.
Identifying Paint Finishes (Matte vs. Semi-Gloss)
The finish of your paint drastically changes how it reacts to adhesives and solvents. Matte or flat paints are porous and brittle. They have a high pigment-to-binder ratio, which makes them look great but hold onto tape aggressively. They are the most susceptible to peeling. If you have matte walls, you must be extremely slow with your removal.
Semi-gloss and satin finishes are much more durable because they contain more resin, creating a smoother, more flexible surface. This sheen acts as a protective layer, resisting solvents better than flat paint. However, they are prone to “burnishing”—this happens when you scrub too hard, and the finish changes from a soft satin to a noticeable, shiny spot that stands out against the rest of the wall.
Why Older Paint Jobs are Higher Risk
Paint does not stay flexible forever. Over years of exposure to sunlight, varying humidity, and temperature changes, the resins in the paint oxidize and become brittle. If your home has an older paint job, it is significantly more likely to flake off in large, jagged chips when you pull at tape. You should always perform a “hidden spot test” behind a door or near a floor-level baseboard before tackling a large strip of tape in a high-visibility area.
The Preparation Phase: Don’t Skip This
Why Most People Fail
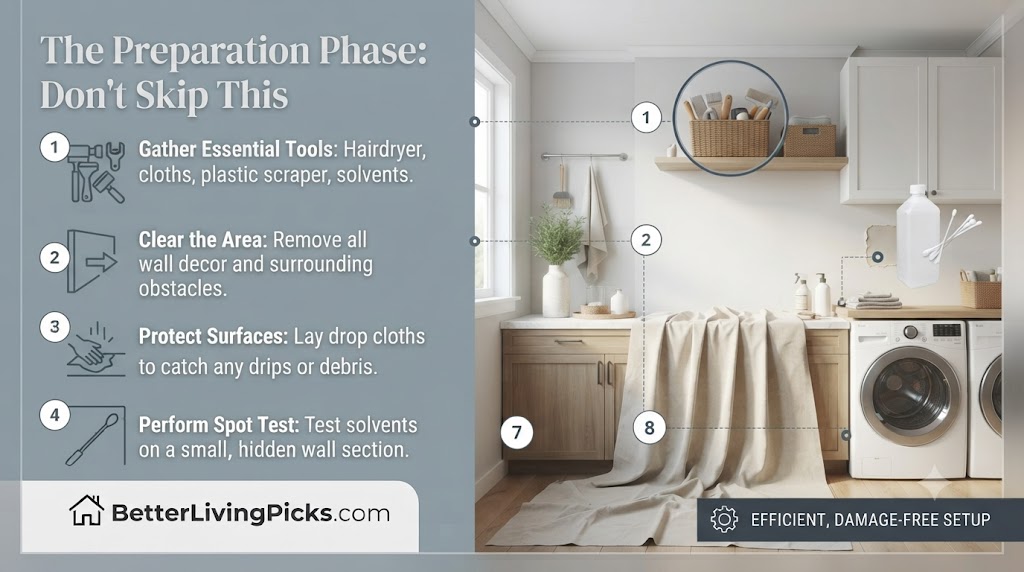
Most people try to remove tape while they are in a rush. They grab the end of the tape and rip. This is the single biggest cause of wall damage. Preparation is 90% of the work. You need to gather the right tools and prepare the wall surface so it is ready for the removal process. If the wall is covered in dust or grime, the tape might even be bonding to that layer rather than the paint, making the situation even more complicated.
Essential Supplies Checklist
You do not need professional hardware for this. Stick to these basics:
- Hairdryer: Must have adjustable heat settings.
- Microfiber cloths: These are essential because they don’t leave lint and are soft enough to avoid scratching.
- Dish soap: A grease-cutting brand like Dawn is ideal for breaking down adhesive oils.
- Isopropyl alcohol (70% or higher): This is the gold standard for residue removal as it evaporates quickly.
- Plastic putty knife or old loyalty card: Use this to push against the tape without creating a sharp edge.
- Warm water: Keep a small bowl of warm (not boiling) water nearby.
The Critical “Hidden Spot” Test
Before applying any liquid, test it in an area where nobody will see it. Dab a tiny bit of your chosen solvent on the wall and let it sit for two minutes. Wipe it away gently. Does the paint color come off on the cloth? Does the finish become cloudy? If the answer is yes, abandon the solvent and stick to warm, soapy water. If the wall looks unchanged, you are safe to proceed.
The Heat Method: Gentle Adhesive Softening
How Heat Changes the Physics
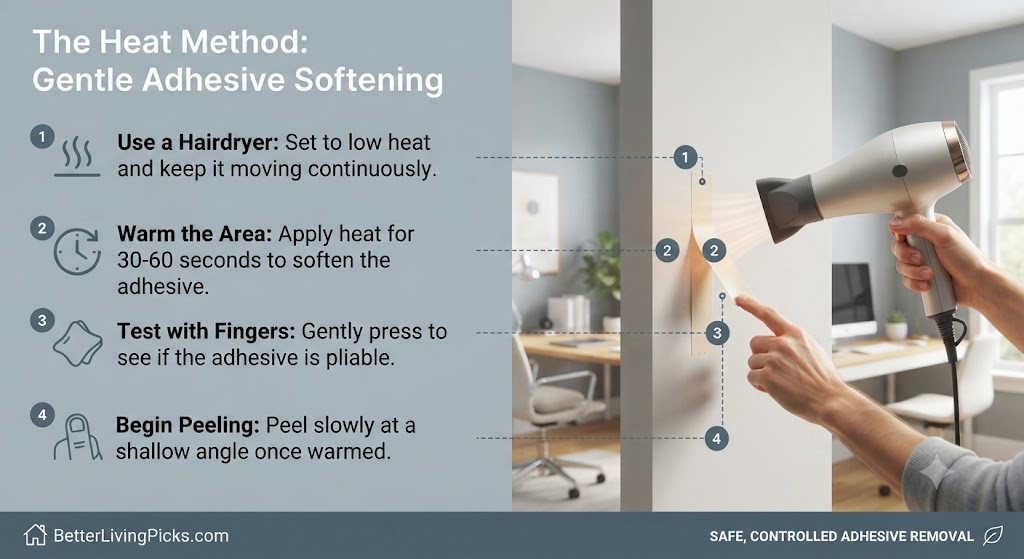
Adhesive tape uses pressure-sensitive adhesives that are designed to be tacky at room temperature. Heat changes their molecular structure, making them more fluid and less sticky. By heating the tape, you are effectively turning a solid, high-tack bond into a soft, gel-like substance that prefers to stay on the tape backing rather than sticking to your wall.
Using a Hairdryer Safely
Hold your hairdryer about six inches away from the tape. Move it back and forth continuously. Do not hold it in one spot. You want to warm the entire surface area of the tape gradually. If the wall feels uncomfortably hot to the touch, you are too close. Thirty seconds of consistent, low-heat airflow is usually enough to make the tape feel pliable. If the tape is thick, like double-sided foam tape, you may need a full minute of warming.
Finding the Right Temperature
Always start on the lowest setting. High heat can cause certain paints to soften or “bubble” if they are cheap or poorly applied. You are looking for that sweet spot where the tape loses its “snap.” If you find that the tape is still holding tight after a minute of low heat, increase the temperature, but keep the hairdryer moving. Remember, you are trying to soften the adhesive, not bake the paint.
Solvent Solutions for Stubborn Residue

Rubbing Alcohol vs. Commercial Removers
Isopropyl alcohol is a great choice because it evaporates quickly and is generally safe for most modern paints. Apply it to your cloth, not directly to the wall. Direct application leads to drips, which can leave permanent streaks.
Commercial removers like Goo Gone are incredibly effective at liquefying adhesive, but they are oil-based. If you use an oil-based product on a flat or matte wall, you will be left with a dark, oily spot that is nearly impossible to clean without stripping the paint. If you use an oily solvent, you must follow up immediately with a degreasing dish soap solution to remove the oil residue.
The Dish Soap and Warm Water Technique
This is the safest method for almost all paint types. The soap lowers the surface tension of the water, allowing it to penetrate the adhesive bond. Dip your cloth, wring it out so it is just damp, and press it firmly against the residue for 60 seconds. This “soak” time is what does the work. After a minute, the residue should begin to lose its grip, allowing you to wipe it away with a clean part of the cloth.
Natural Alternatives: Olive Oil and Vinegar
If you are allergic to chemicals or want a greener solution, a mixture of equal parts olive oil and white vinegar works surprisingly well. The acetic acid in the vinegar helps dissolve the adhesive, while the oil keeps the residue from re-sticking to the wall. Warning: Use this only on high-gloss or semi-gloss surfaces. Oil will soak into matte paint and leave a permanent stain.
The “Parallel Pull” Technique
Once you have applied heat, start at one corner of the tape. Here is the secret: pull at a very shallow angle—almost parallel to the wall—rather than pulling out away from the wall. Pulling away from the wall creates tension that forces the paint to peel. Pulling parallel forces the tape to stretch, which helps release the adhesive bond safely.
The “Tape-on-Tape” Dabbing Trick
If the tape comes off but leaves a sticky trail, do not reach for a razor blade. Take a fresh piece of tape, press it firmly onto the remaining residue on the wall, and pull it off quickly. This “dabbing” technique often lifts the remaining adhesive off without needing any chemicals at all. It works because the fresh, clean adhesive on your spare piece of tape is usually more attracted to the old residue than the painted surface is.
How to Clean Up Without Scrubbing
If you must scrub, use light, circular motions. Applying too much pressure in one spot is a common mistake that leads to “patchy” looking walls where the paint sheen has been rubbed away. Always finish by wiping with a clean, damp cloth to remove any leftover soap. If you leave soap residue on the wall, it can attract dust and grime over time, creating a dirty patch that will be visible in a few months.
What to Do If You Peeled the Paint
Assessing the Damage
If you accidentally pull off a small chip, take a deep breath. It happens to the best of us. First, check if you can find the piece of paint that came off. If it is clean, you can sometimes carefully stick it back in place with a tiny, microscopic dot of wood glue or clear adhesive. Use a toothpick to apply the glue so it doesn’t squish out the sides.
Patching and Spot Painting Like a Pro
For larger spots, use a small amount of lightweight wall spackle. Fill the divot, let it dry for the time recommended on the packaging, and sand it very lightly with fine-grit (220+) sandpaper so it is perfectly flush with the wall.
Once smooth, dab a tiny bit of paint on the area. Crucial Tip: Use a small artist’s brush instead of a wall roller. A roller will leave a texture (“stipple”) that will look vastly different from the rest of the wall. By using a small brush and dabbing the paint on, you mimic the texture created by the original roller, making the patch virtually invisible.
Frequently Asked Questions
Can I use nail polish remover?
Do not use nail polish remover (acetone) on your walls. It is a powerful, aggressive solvent that will strip paint, melt plastic-based finishes, and leave a permanent, discolored white spot on almost any wall surface. It is far too strong for household paint removal.
How do I remove duct tape without pulling off paint?
Duct tape is notorious for leaving residue and damaging paint. The key is to be extremely patient with the heat method. You must spend extra time warming the adhesive, as the backing is thick and requires consistent, deep heat to release its hold on the wall. Never pull duct tape quickly.
Will WD-40 ruin my wall?
WD-40 can remove residue, but it is an oil-based product that will likely stain flat or matte wall paint. If you use it, you will likely have to wash the area with a heavy-duty degreaser afterward, which might still leave a visible mark. Use isopropyl alcohol instead as it evaporates completely.
What is the best tool for scraping residue?
Your best tool is a plastic card, such as an old loyalty card or a credit card you no longer need. It is firm enough to push adhesive off but soft enough that it will not scratch the drywall or the surrounding paint finish. Metal tools, like a screwdriver or box cutter, should stay in the toolbox.
How long should I leave a solvent on the wall?
Never leave solvents like alcohol or commercial removers on your wall for more than a minute or two. If left too long, these substances can soak into the paint and cause it to soften, leading to an even worse mess than what you started with. Always wipe clean quickly.
Does the age of the wall paint matter?
Yes, age matters immensely. Paint that has been on the wall for five or more years is often more brittle and susceptible to damage. In older homes, always assume the paint will want to peel and prioritize the heat method above everything else.
Final Thought
Removing tape residue can feel like a high-stakes surgery for your walls, but with a bit of patience and the right heat, you can walk away with a clean finish. Take your time, test your methods in small, hidden areas, and do not rush the process. If you follow these steps, your walls will look as good as new, and you will save yourself the headache of a last-minute painting project. Remember: if the tape fights back, add more heat, not more pressure. Good luck with your project!

