

Yes, use iron-on buckram header tape and metal drapery pleat hooks to create structure. This creates a professional finish identical to sewn pleats without requiring any actual sewing skills.
2. What is the biggest mistake when pleating curtains?
The most common error is improper spacing. If your measurements are slightly off, the pleats will look uneven and sag. Always calculate your curtain width and mark your spacing clearly before inserting hooks.
3. How do I get that “custom” crisp pleat look?
The secret is stiff buckram tape combined with high-heat steam. After hanging the curtains, use a steamer to vertically press the pleats from top to bottom, which permanently sets the fabric’s “memory.”
4. What hooks should I buy for a DIY pleat?
Invest in adjustable-height drapery pin hooks. These allow you to precisely fine-tune the curtain’s position on the rod, ensuring they hang at the perfect “kiss-the-floor” length every time.
Nothing drags down a room’s aesthetic faster than cheap, flat curtain panels that hang like lifeless sheets. You might have bought them for the color, the price, or the convenience, but once they are hung, they lack that architectural structure that makes designer drapery look so intentional. Most store-bought curtains suffer from a “flat header” problem, where the fabric lacks the weight and rhythm of custom window treatments.
The secret to fixing this isn’t buying expensive custom curtains from a studio; it is adding pinch pleats. By introducing intentional, structured folds at the header, you transform generic, store-bought fabric into high-end, tailored window treatments. This is a classic designer trick that shifts the focus from the fabric quality to the elegance of the drape. In this guide, we will break down exactly how to achieve that custom look with a few simple, non-sewing tools.
Why Pinch Pleats Change Everything
Flat panels look temporary and unfinished. When you walk into a room with pinch-pleated curtains, your eye immediately notices the rhythm, repeat, and volume of the fabric. Pleats force the fabric into a permanent wave pattern, which instantly makes even the thinnest, most budget-friendly material appear significantly more substantial and “heavy.”
This method mimics the construction techniques used in luxury drapery workrooms. It pulls the fabric tight where it needs to be and forces it to fall in controlled, deep, and elegant folds. It is arguably the single most effective way to upgrade a standard “off-the-shelf” panel into something that looks like it cost ten times the original price tag. Once you see the difference, it becomes difficult to look at a flat-hanging curtain the same way again.
Understanding Drapery Construction

To successfully perform this DIY, you must understand how drapery works. The “header” is the top portion of the curtain. On cheap curtains, this header is usually a simple rod pocket or a flimsy fold. By adding buckram a stiffened fabric tape, you are giving that header a skeleton.
This skeleton is what allows the pleats to stand up and hold their shape. Without the stiffener, the weight of the curtain would simply pull the fabric flat again. The combination of the stiff buckram and the metal hooks creates an architectural foundation that supports the entire weight of the panel, allowing it to glide smoothly along your rod while maintaining its pleated appearance.
Tools and Materials Checklist

You do not need a professional workshop to pull this off. Keep your kit simple but effective.
- Drapery Header Tape (Buckram): This is non-negotiable. Look for the stiff, iron-on variety. It provides the backbone for your pleats.
- Pleat Hooks (4-prong or 2-prong): You want the sturdy metal kind. These are designed to slide into the pockets of your buckram tape and create the physical fold.
- Measuring Tape: Accuracy is critical. Take your time during the measuring phase to avoid lopsided pleats.
- High-Quality Steam Iron: This is your best friend for setting the pleats.
- Fabric Scissors: Keep them sharp. Dull scissors will fray the edges of your curtain header.
- Fabric Steamer: A handheld steamer is essential for the final “training” of the curtains once they are hung.
- Needle-Nose Pliers: Useful for tightening the metal hook prongs if they seem loose after installation.
Preparing Your Fabric for the Upgrade
Before you start ironing or inserting hooks, you must prepare the curtain panel. Start by removing the curtains from the rod and laying them flat on a large, clean surface, a dining table or a clean floor works best.
Ensure the curtain is completely smooth. If it is wrinkled, iron the entire panel first. You cannot get accurate spacing if the fabric is bunched or wrinkled while you are measuring. Check the top edge of your curtain; if it is uneven, trim it slightly so that your header tape will sit perfectly horizontal across the top. This prep step is often ignored by beginners, but it is the difference between a project that looks “handmade” and one that looks “hand-crafted.”
Step-by-Step: The No-Sew Pinch Pleat Hack
Installing the Buckram Tape
Lay your curtain face down. Align your buckram header tape along the top edge of the fabric. Leave about a half-inch of fabric at the very top to fold over for a clean finish, or align it exactly if your tape is pre-finished. Use your iron according to the tape manufacturer’s instructions. Apply steady, firm pressure to ensure the adhesive bonds permanently. Once it cools, the top of your curtain should feel significantly stiffer.
Calculating and Marking Spacing
This is the math phase. Measure the width of your curtain header. Let’s say your panel is 50 inches wide. You need to decide how many pleats you want. A good rule of thumb is to have a pleat every 4 to 6 inches.
Use a chalk or a fabric-safe marker to place dots along the back of the buckram tape where each pleat will be placed. Start from the center and move outward to ensure the spacing is symmetrical. If your marks are off by even a quarter-inch, the pleats will look irregular when hung.
Inserting the Pleat Hooks
Take your 4-prong pleat hook. The prongs will slide into the specific pockets on your buckram tape. By inserting the prongs into adjacent or specifically skipped pockets, you pinch the fabric between the prongs together to form the “pinch” of the pleat.
Push the prongs all the way down until they reach the bottom of the tape pocket. Ensure the hook is centered. Repeat this for every set of marks you made on the tape. Once the hooks are in, the curtain will naturally want to fold into those pinch patterns.
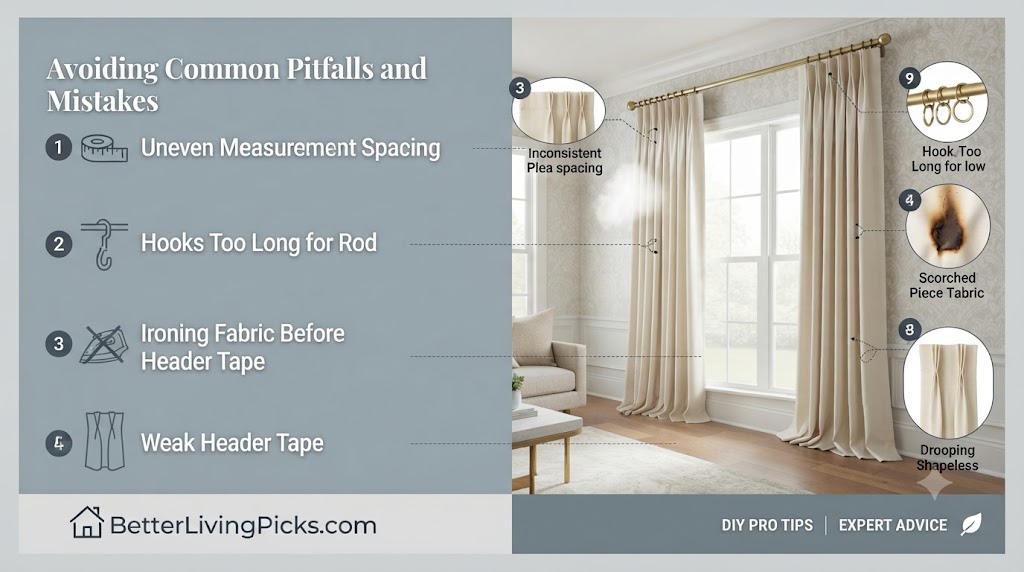
Avoiding Common Pitfalls and Mistakes

/
The most common failure point for DIYers is uneven hook insertion. If you rush the measuring phase, you will end up with wide, gaping folds in some areas and tight, bunched fabric in others. Take five to ten minutes to double-check your spacing before you insert a single hook.
Another frequent problem is improper hook height. If you use hooks that are too long, the header of the curtain will hang too far below the rod, exposing the rings and the rod itself. This can look messy if you were going for a sleek, hidden-hardware look. Use adjustable hooks so you can move the prongs up or down to hide the rod exactly where you want it.
Finally, don’t skip the steaming. If you hang the curtains and walk away, they will look like a wrinkled mess. You must steam the vertical lines of the pleats while they are hanging. This sets the “memory” in the fabric, telling the curtain how it should fall when it is opened or closed.
Styling Tips for a Professional Finish

Once the pleats are set, the styling phase begins. “Training” your curtains is the secret that most interior designers use to keep window treatments looking like a million dollars.
To train them, fold the curtains into their pleated pattern and tie them together with strips of fabric or soft twine at the top, middle, and bottom. Leave them tied up for at least 24 to 48 hours. When you untie them, the fabric will naturally fall into the perfect, uniform ripple pattern you’ve created.
Choose your rings wisely. If your curtain rod is matte black, ensure your curtain rings are also matte black. Nothing screams “budget” louder than mixing hardware finishes, like brass rings on a silver rod. Consistency is the hallmark of professional design.
Lastly, focus on the hem. If your curtains are pleated but stop two inches above the floor, the illusion of luxury breaks. Pleated curtains look best when they “kiss” the floor just barely touching it. If they are too short, move your rod up. If they are too long, consider an iron-on hem tape to adjust the length.
Advanced Pleat Variations

Once you have mastered the basic pinch pleat, you can experiment with more advanced styles. The “triple pinch pleat” is the classic choice for formal dining rooms and living spaces. It requires slightly more fabric and more careful hook placement, as you are grouping three layers of fabric together into one deep pinch.
Alternatively, you could try the “goblet pleat,” where the pleat is pushed out at the top to form a small, rounded cup. This looks sophisticated and architectural but is technically a bit more challenging to set correctly. Start with the standard pinch pleat, and once you feel confident in your measuring and iron-on skills, feel free to try more complex styles.
The Role of Fabric Weight
It is important to manage your expectations based on your curtain fabric. Lightweight, polyester-blend curtains will pleat well, but they may need more frequent “retraining” with a steamer because they lack the weight to hold the crease on their own.
Heavyweight curtains, like velvet or thick cotton, hold a pleat beautifully. However, they are also heavy. Ensure your curtain rod is mounted securely into studs, as adding pleats and buckram increases the overall weight of the panel. If you are working with very heavy velvet, you may need to use heavier-duty metal hooks to prevent them from bending under the weight.
Maintaining Your DIY Pleated Curtains
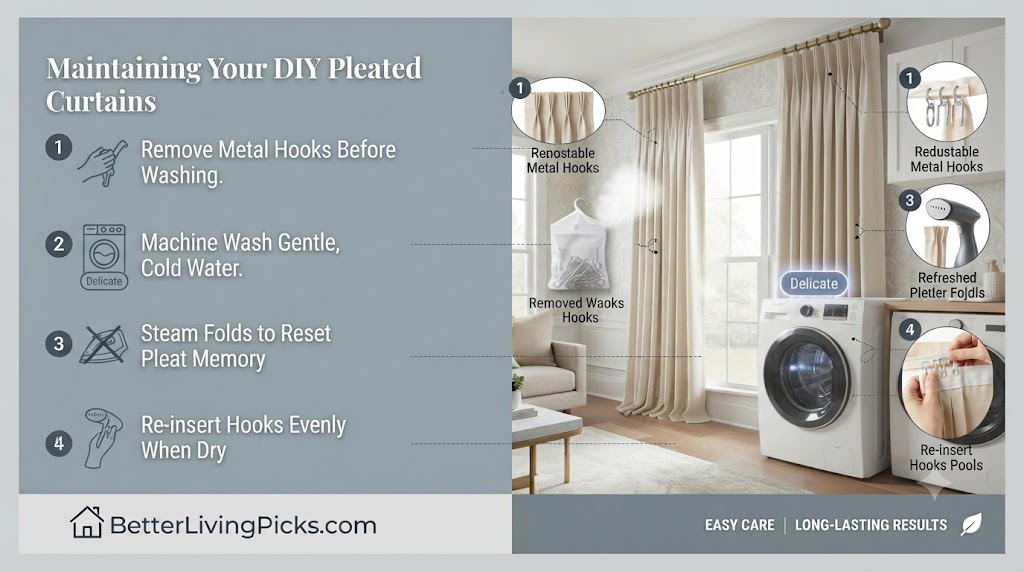
Maintenance is the final step in the lifecycle of your curtains. Whenever you decide it is time to clean them, you must remember the golden rule: remove the metal hooks.
Many people forget this, throw the curtains in the wash, and end up with shredded fabric or a broken washing machine. Keep a small mesh bag or a Ziploc bag specifically for your pleat hooks. When you take the curtains down to wash, put the hooks in the bag immediately. This ensures you won’t lose any over time, as replacement hooks can sometimes be hard to find in local stores.
After washing, hang the curtains back up while they are still slightly damp if possible. The weight of the damp fabric will help pull out any new wrinkles, and the pleats will reset themselves as they dry in the correct, folded position.
Frequently Asked Questions
Can this work on lightweight, sheer curtains?
Yes, it works, but you must be very careful with the heat settings on your iron. Sheer fabrics burn easily, so always use a pressing cloth, like a thin cotton pillowcase, between the iron and the buckram tape. The added structure actually helps sheers look much more expensive because it eliminates that cheap, “plastic” drape and gives them a consistent, vertical flow.
How many pleats should I use per panel?
For a standard 50-inch panel, five to seven pleats usually provide the best look. Too many pleats in a narrow panel can make the header look crowded and messy, while too few can make the curtain look like it is hanging from a clothesline. Focus on having an even number of pleats to keep the fabric balanced across the rod.
Do I need to remove the hooks to wash the curtains?
You absolutely must remove the metal hooks before putting the curtains in the wash. If you leave them in, they can rip the fabric or destroy your washing machine drum. Keep them in a safe place so you don’t lose them, and reinstall them only after the curtains are dry or nearly dry.
What if my curtains are made of velvet or thick fabric?
Thicker fabrics are actually easier to pleat because they hold their shape better. Use a stronger, heavy-duty iron-on header tape, and you might need a thicker-gauge pleat hook to support the weight of the fabric. Ensure your curtain rod is installed securely into wall studs, as thick velvet combined with hardware can be surprisingly heavy.
How do I fix a pleat that keeps falling out?
If a pleat loses its shape, it means your header tape isn’t stiff enough or the hook is loose. Use a pair of needle-nose pliers to gently squeeze the prongs of the hook tighter once inserted into the tape. This effectively “locks” the fabric into the pleat and prevents it from sliding out of the prong when you move the curtains.
Will this work on tab-top curtains?
It is very difficult to convert tab-top curtains because they lack the flat, wide header needed for buckram tape. You are better off buying rod-pocket or flat-panel curtains for this project. Trying to alter tab-top curtains usually leaves visible, ugly holes where the tabs were originally attached, which ruins the “expensive” look you are going for.
Final Thoughts on Your Window Upgrade
Upgrading your home doesn’t have to mean spending thousands of dollars on custom-made window treatments. By taking an afternoon to add pinch pleats to inexpensive, off-the-shelf curtains, you achieve that coveted, structural look that defines professional interior design. It is a small, quiet detail, but it fundamentally changes the silhouette of your room.
You are not just hanging fabric anymore; you are creating an architectural element that frames your view. Grab your header tape, your hooks, and a good steam iron, and start transforming those flat panels today. The results will surprise you, and you will find that the pride of a DIY project well-done is worth far more than the money you saved.

