
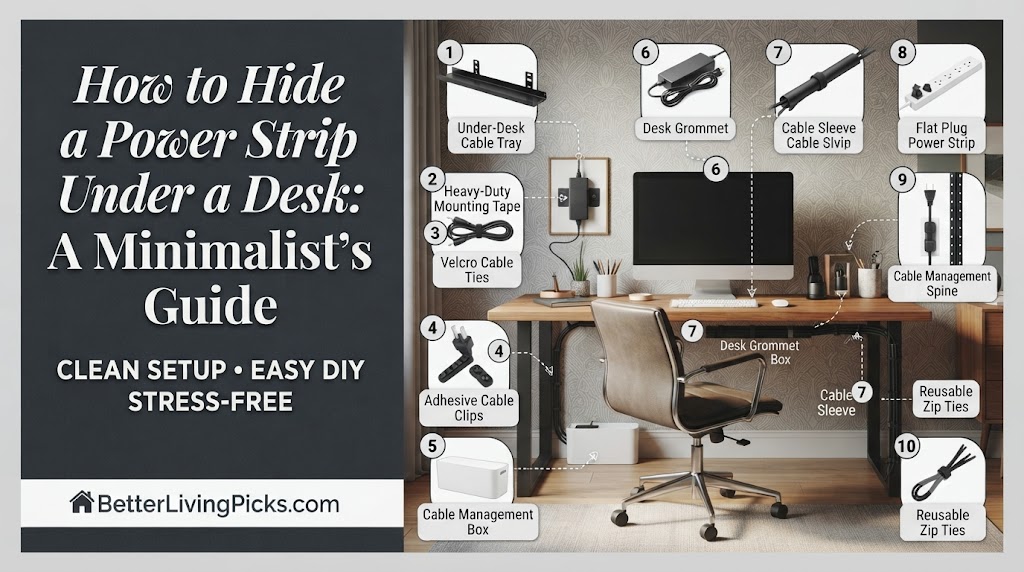
Use a sturdy metal cable management tray screwed directly into the desk frame. This supports the weight of heavy power bricks while providing ample room to hide excess cord length internally.
2. Can I use adhesive instead of drilling holes?
Yes, heavy-duty 3M VHB mounting tape is incredibly strong. Clean your desk surface thoroughly with rubbing alcohol first to ensure a bond that can support your power strip for years.
3. How do I stop my desk from looking like a spiderweb?
Use reusable Velcro cable ties to bundle cords into a single “umbilical” line. Pair this with adhesive cable clips along the back of the desk to keep the wire run perfectly straight.
4. Is it safe to hide a power strip under a desk?
Yes, as long as you maintain airflow. Never wrap the strip in fabric or enclose it in a tight space that prevents heat dissipation. Always ensure the strip is not overloaded beyond its surge rating.
Nothing kills a productive vibe faster than a tangled, dusty nest of cables hanging off the back of your desk. It is an eyesore that turns a modern, sleek workspace into a chaotic trap, constantly catching your feet and collecting layers of lint. Beyond the frustration of cable clutter, there is a real psychological impact; visual noise directly competes for your focus, making it harder to settle into deep work when your environment feels untidy.
Taming your power distribution is the single most effective step you can take to upgrade your office. It is not just about aesthetics; it is about reclaiming your space and building a system that actually works for you. With a few professional-grade tools and a systematic approach, you can tuck every single cable out of sight, transforming your setup into the clean, professional, and minimalist sanctuary you have always wanted.
Why You Need to Hide Your Power Strip

Reducing Visual Noise for Better Focus
Your workspace acts as an extension of your mind. When you sit down to work, your brain instantly scans your environment. If that scan is interrupted by a chaotic mess of black, tangled wires, you are subconsciously signaling “disorder” to your brain. By clearing the clutter, you create a “blank slate” effect. This reduction in visual noise is proven to help maintain concentration, lower stress, and keep your attention centered entirely on the task at hand rather than the mess under your feet.
Protecting Your Cables from Dust and Pets
Beyond the mental benefits, there is a practical necessity. Wires are the primary collectors of dust in any home office. Once dust settles on a cable, it is difficult to clean, eventually leading to a grimy, sticky mess that is unpleasant to touch. Furthermore, if you own cats or dogs, hanging cables are a massive temptation. Mounting your power strip under the desk keeps those vital connections elevated and away from curious mouths and claws, extending the life of your expensive hardware and making the floor space beneath your desk trivial to vacuum or sweep.
Enhancing Workspace Flexibility
When your power strip is anchored to the desk, your workspace becomes modular. You no longer have to worry about tripping over a power cord when you adjust your chair or bump into the desk. More importantly, when you decide to rearrange your peripherals like moving a monitor arm or swapping out your keyboard, your power distribution system stays in place, making the entire process of upgrading your setup significantly smoother and faster.
Essential Tools for a Minimalist Cable Setup

The Power Strip Selection
Not all strips are built for hiding. Look for a strip with a flat, low-profile plug and long spacing between outlets to accommodate bulky power adapters. Some modern minimalist strips even come with built-in side-mounting holes, which makes attaching them to the underside of your furniture significantly easier than using generic plastic clips.
Mounting Systems: Trays vs. Brackets
If you have a large amount of excess cable, a metal wire mesh tray is your best friend. These trays span the width of your desk, acting as a “corral” for both the power strip and any excess cabling. If you prefer a tighter, more invisible look, individual mounting brackets are excellent. These hold the power strip flush against the wood, leaving nothing visible from the front. If you have a standing desk, ensure your tray is mounted far enough back so it doesn’t collide with the desk legs when the height changes.
Essential Management Hardware
Do not underestimate the power of Velcro cable ties. Unlike zip ties, they are infinitely reusable. If you realize three months later that you need to add an extra USB charger, you won’t have to cut and replace every tie on your desk. Additionally, pick up a pack of adhesive cable mounts (the little squares with slots) to route your cables precisely along the underside of the desk surface. These force your cables into clean, parallel lines that look intentional rather than haphazard.
Step-by-Step: Mounting the Power Strip Under the Desk

Planning and Mapping
The biggest mistake people make is rushing the mounting process. First, unplug every device. Take your power strip and hold it under the desk. Position it so that the main power cord reaches the wall outlet comfortably, and your device cables have enough slack to plug into the strip without being pulled taut. Use a pencil to mark where the strip will sit. If you have a height-adjustable desk, perform a “dry run” with the desk at its highest position to ensure you have enough slack in your wall power cord.
Preparing the Surface
Whether you are using screws or adhesive tape, the surface of your desk must be clean. Over time, wood creates a fine layer of dust, and metal frames collect oils. Use a microfiber cloth with a small amount of isopropyl alcohol to wipe down the area where your mounting hardware will be attached. This step is critical; if you skip it, your setup may fall within a few weeks due to dust interference. Let the area dry completely before proceeding.
The Installation
If you are drilling, use a small pilot drill bit first. This prevents the wood from splintering and ensures your screw goes in straight. If you are using adhesive, apply firm, consistent pressure for at least 60 seconds to ensure the bond sets properly. Once your tray or bracket is installed, mount the power strip.
Organizing the Excess
Now that the power strip is mounted, start plugging in your devices. Do not just let the excess wire hang. Take the extra length, loop it into a circle about the size of a dinner plate, and secure it with a Velcro tie. Once the bundle is neat, attach it to the underside of the desk frame using an adhesive cable clip or place it directly into your tray. By the time you are finished, you should only see one primary power cable leading away from the desk to the wall.
Common Mistakes to Avoid During Installation

Overloading Your Circuits
It is tempting to plug everything into one massive power strip. However, your home outlets have a limit. Daisy-chaining, plugging a power strip into another power strip is a recipe for a blown fuse or, in worst-case scenarios, an electrical fire. Stick to the rated capacity of your strip, and if you find yourself running out of outlets, consider using a high-quality, high-wattage power strip rather than doubling up.
Ignoring Thermal Management
Power bricks the heavy blocks on your cables, generate heat. If you pack them too tightly into a small space or bury them deep inside a cramped cable box, that heat cannot escape. This can degrade the internal components of your chargers over time. Always ensure there is a small gap between your power adapters to allow for natural airflow.
Neglecting Reachability
One common oversight is mounting the power strip in a “perfect” location that is completely inaccessible. You will eventually need to reach the power switch to reset a frozen device or turn your system off during a storm. Place the strip near the rear edge of the desk frame. This provides a “sweet spot” where it is completely hidden from the front view but easily reachable by simply reaching behind or under the desk.
Pro Tips for Keeping the Setup Clean Long-Term
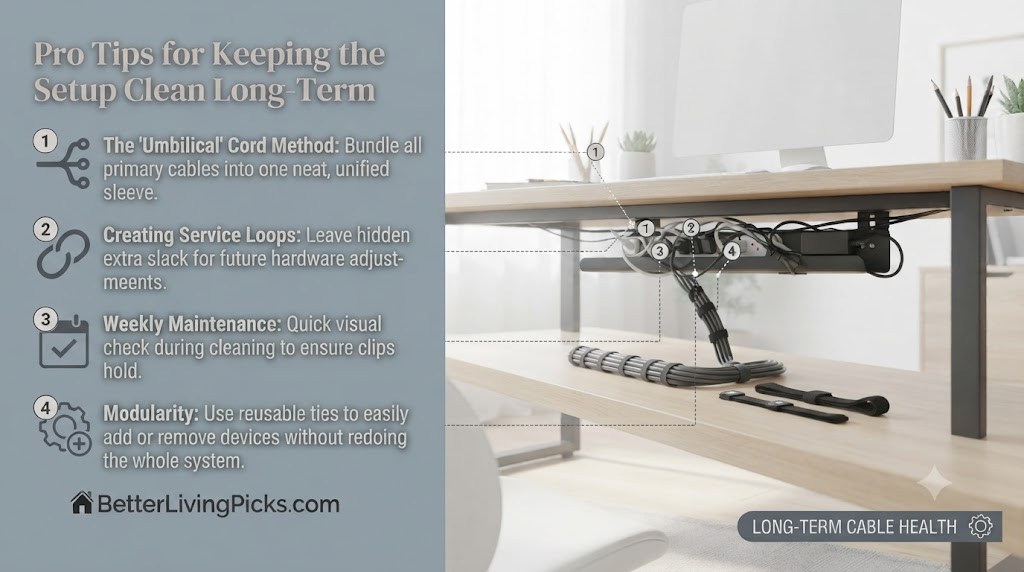
The “Umbilical Cord” Method
The secret to a truly clean desk is grouping all your cables. If you have a monitor, a laptop, and speakers, don’t let their cables wander to the wall separately. Gather them together as soon as they leave the desk and use a flexible cable sleeve (often called a “cable snake”) to wrap them together. This turns five or six individual, messy wires into a single, clean-looking line that mimics the look of a professional office install.
Creating Service Loops
Always leave a “service loop” of extra wire hidden under the desk. If you ever need to pull your monitor forward or move your PC case to a different side, a service loop gives you the slack to do so without having to untie and redo your entire cable management system. Think of it as an “insurance policy” for future hardware changes.
Weekly Maintenance Habits
Once you have your system installed, it stays clean for a long time. However, every month or two, take a moment to look under the desk while vacuuming. Dust off the cable tray and ensure your adhesive clips are still firmly attached. A quick check takes thirty seconds and ensures your “minimalist” setup stays functional for years.
Frequently Asked Questions
Is it safe to mount a power strip using double-sided tape?
Yes, provided you use high-quality, industrial-strength double-sided tape like 3M VHB. Ensure the underside of your desk is clean and free of dust before application. Avoid using cheap office-grade tape, as it will likely fail under the weight of several plugs and adapters.
How do I handle cables that are too long?
The best way to manage excess length is by coiling the cable neatly and securing it with a reusable Velcro strap. Tuck these coils into your cable management tray or secure them against the underside of the desk using adhesive cable tie mounts to ensure they stay out of sight.
Should I mount the strip vertically or horizontally?
Horizontal mounting is usually better for power strips because it makes it easier to plug in bulky “wall wart” adapters side-by-side. If you mount it vertically, some of your larger plugs may block the adjacent outlets, wasting space and making it impossible to utilize every socket.
What if my desk is made of glass or metal?
For glass or metal desks, you cannot use screws. Use heavy-duty, adhesive-backed mounting brackets or a dedicated clamp-style cable tray that attaches directly to the edge of the desk. These provide a sturdy base without requiring you to drill into the surface.
Can I use a power strip inside a cable management box instead?
Yes, using a cable management box is a great alternative if you don’t want to drill into your desk. It sits on the floor or a shelf and acts as a “shell” to hide the strip and the mess, though it is slightly less “minimalist” than mounting it under the desk where it vanishes entirely from the room’s line of sight.
How do I manage the power cord running from the wall?
Use adhesive cable clips or a flexible cable sleeve to bundle the main power cord against the desk leg. This makes the cord appear as a singular, intentional line leading to the outlet, effectively hiding the mess from view and preventing it from being a tripping hazard.
Final Thought
Achieving a truly minimalist workspace is a journey, not a destination. By moving your power strip off the floor and securing it firmly under your desk, you are doing more than just tidying up, you are removing the physical barriers between you and your best work. Don’t feel pressured to have the most expensive setup on day one. Start by securing those dangling wires, and watch as your stress levels decrease and your focus sharpens. Once you experience the freedom of a clean, wire-free desk, you will wonder how you ever managed to work in the mess before.