A fully functional station requires at least 36 to 48 inches of linear counter space to comfortably house an espresso machine, dedicated grinder, scale, and accessory staging area without feeling cramped during the morning rush.
2. Should I plug my espresso machine into a standard wall outlet?
Most entry-level home machines run fine on standard 15-amp kitchen circuits, but high-end dual-boiler machines with heavy commercial heating elements often require dedicated lines to prevent tripped breakers and power fluctuations.
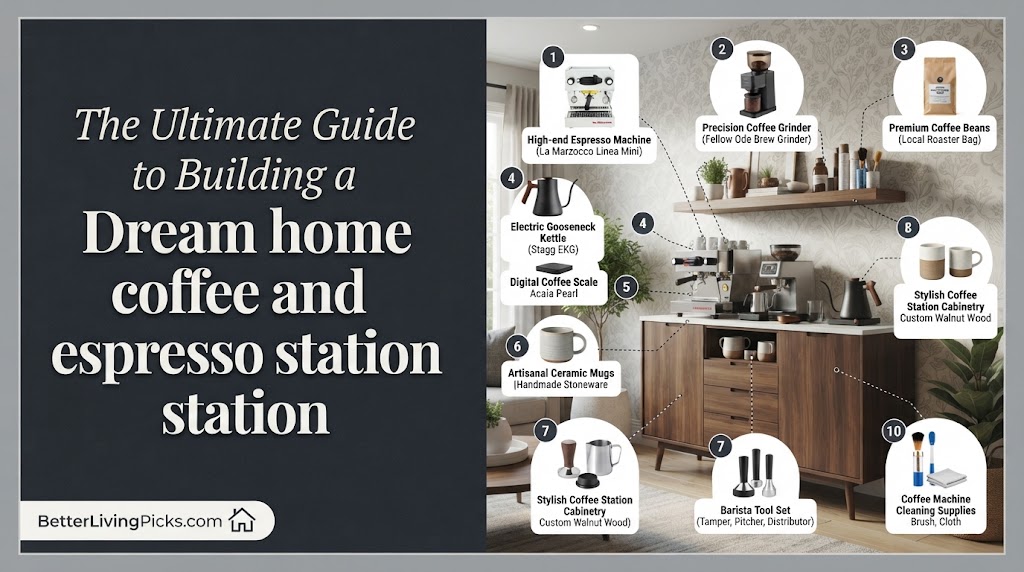
Setting up a dedicated home coffee and espresso station transforms your daily morning routine from a rushed, chaotic chore into an intentional, grounding ritual. When you stop chasing scattered paper filters, stray coffee grounds across the laminate counter, and misplaced tampers, making your favorite morning drink becomes an effortless, deeply enjoyable experience. Building a functional, beautiful corner requires careful attention to counter space limits, electrical load requirements, and efficient physical workflow patterns. This comprehensive guide walks through every single step required to design, organize, outfit, and maintain a professional-grade specialty setup right in your kitchen, ensuring your financial investment pays off in exceptional daily brews for years to come.
A mid-range single-boiler machine with a PID controller offers the absolute best balance of temperature stability and value for anyone building their first serious home coffee and espresso station.
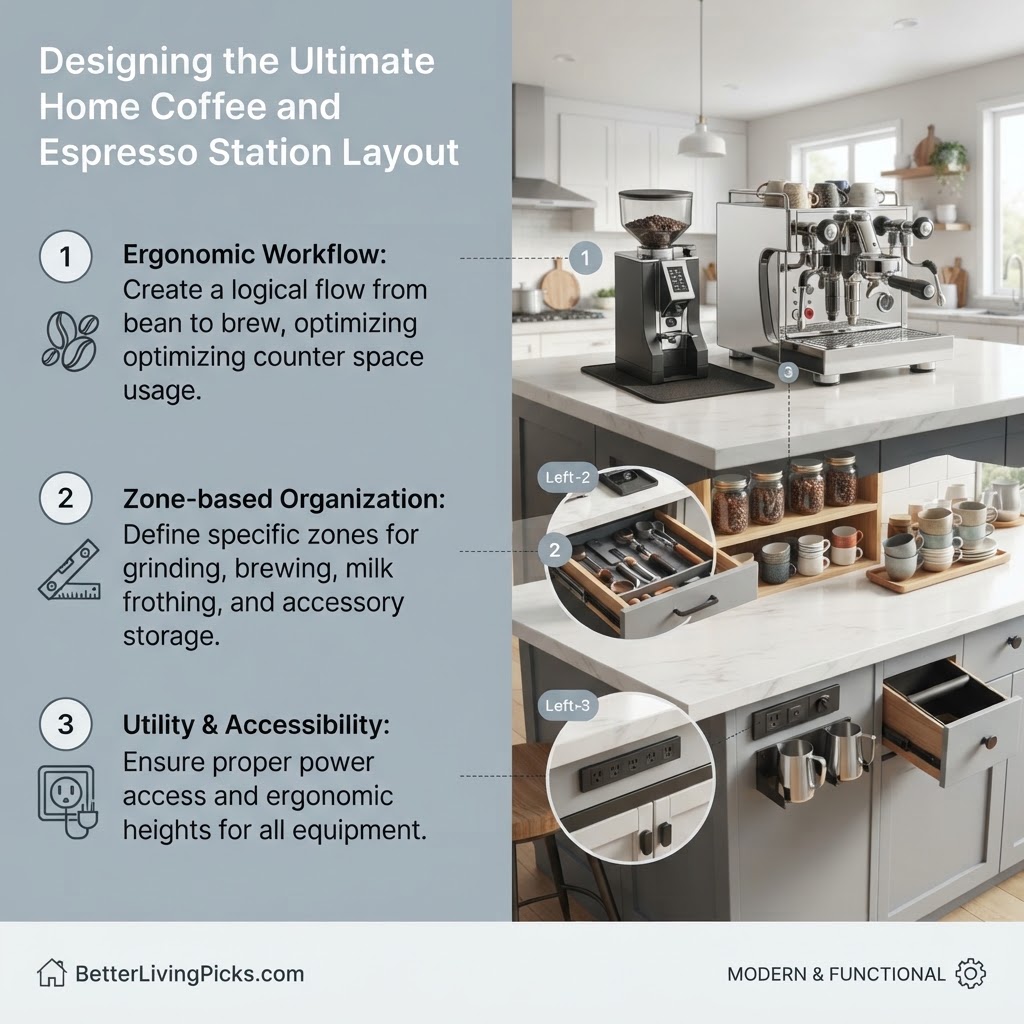
Designing the Ultimate Home Coffee and Espresso Station Layout
Evaluating Kitchen Workflow Patterns and Foot Traffic
Designing an efficient home coffee and espresso station starts by analyzing how you and other family members move through your kitchen during the earliest hours of the day. You want to avoid placing your setup directly in the path of heavy refrigerator traffic, pantry doors, or microwave access points where family members might bump your elbows while you are tamping. Mapping out your physical environment ensures that your daily motion paths remain unobstructed by swinging doors or foot traffic bottlenecks. When multiple people share a kitchen, isolating your brewing zone away from the main cooking stove prevents conflicting movements during chaotic breakfast rushes. Taking time to observe your natural morning pacing helps determine whether a corner counter installation or an independent kitchen island setup serves your household better.
Evaluating natural lighting and shadow angles around your planned corner also enhances both the aesthetic presentation and the practical usability of your workspace during early dawn hours. Creating a dedicated sanctuary zone keeps your tools localized and stops items from migrating across other food preparation counters. Ensuring your physical approach vector remains completely clear allows you to move fluidly from bean storage to cup serving without awkward twists or turns.
Measuring Countertop Real Estate and Vertical Clearance Limits
Measuring available linear counter space is a critical step that prevents purchasing oversized hardware that overwhelms your kitchen layout or overhangs cabinet edges dangerously. A standard setup requires plenty of horizontal expanse to house a grinder, espresso machine, tamping mat, and scale side-by-side without crowding your tools. Avoid cramming heavy equipment into tight corner spaces where steam wands cannot articulate fully or removable water tanks cannot be pulled upward for refilling. Leaving a generous buffer zone of empty counter space next to your machine provides a staging area for milk pitchers, demitasse cups, scales, and dosing funnels.
Measuring vertical clearance is just as critical as checking your horizontal measurements, because upper wall cabinets often limit how high you can lift water tanks or hopper lids. Aim for a minimum of 18 to 24 inches of clear vertical space between your countertop surface and any shelving above to ensure comfortable clearance. Checking for under-cabinet lighting fixtures that generate excessive heat protects your bean hoppers from premature thermal degradation and off-flavor development.
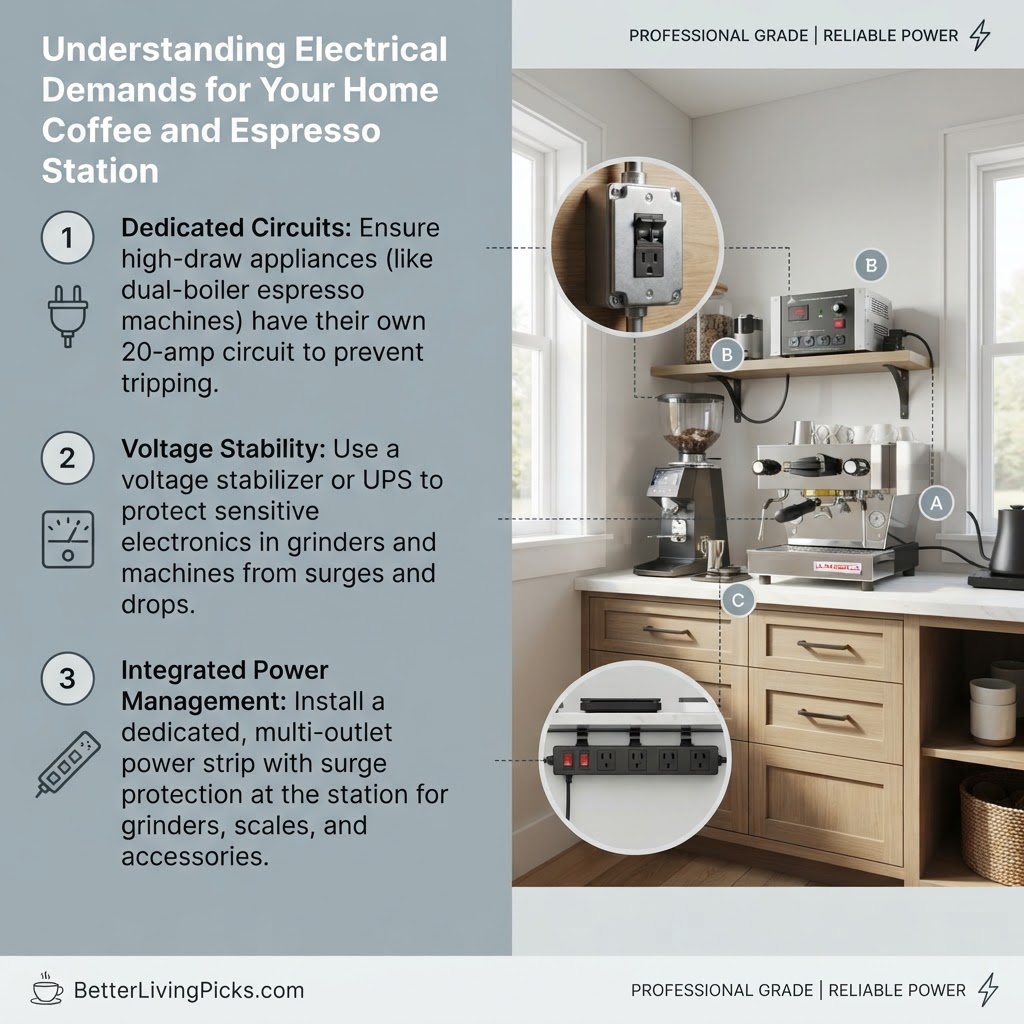
Understanding Electrical Demands for Your Home Coffee and Espresso Station
Calculating Wattage Loads and Preventing Tripped Circuit Breakers
High-powered kitchen appliances demand absolute respect, and a full espresso setup draws significant wattage when heating elements and high-pressure vibratory or rotary pumps engage simultaneously. Plugging both a commercial-grade grinder and a dual-boiler espresso machine into a cheap daisy-chained power strip is a recipe for tripped circuit breakers, melted plastic housing, or severe electrical hazards. Calculating your total appliance amperage ensures you never exceed the standard 15-amp or 20-amp limit of your standard kitchen branch circuit. Running heavy-duty appliances on shared lines causes dimming lights and erratic heating performance that ruins thermal stability during extraction. Take time to check your home’s breaker panel capacity before purchasing high-end dual boiler units that pull upwards of 1500 to 2000 watts under full electrical load.
Understanding how heating cycles interact with concurrent grinder operations prevents unexpected power interruptions right in the middle of pulling an expensive specialty shot. If your kitchen lights flicker when your boiler engages, your circuit is likely overloaded and requires reconfiguration by a licensed professional. Spreading your peripheral appliances across separate wall circuits keeps your primary brewing center stable and prevents frustrating morning power faults.
Installing Dedicated Outlets and Safe Power Management
Verify that your chosen kitchen zone utilizes grounded three-prong outlets capable of handling sustained electrical loads without overheating or causing voltage drops that can damage sensitive internal PID controllers. If you plan on housing your DIY coffee bar setup in a pantry or custom cabinetry hutch, consult a licensed electrician to install recessed outlets that meet local building codes and support continuous thermal output. Using heavy-duty commercial-grade surge protectors with integrated circuit breakers provides an extra layer of defense against unexpected power surges or lightning strikes. Keeping your cords neatly bundled away from water contact zones prevents short circuits and protects household members from accidental electrical shocks.
Inspecting your wall receptacles periodically for signs of discoloration or loose fitting prongs ensures your high-draw equipment operates safely over years of continuous daily use. Never run thick power cables across walkways where foot traffic can fray insulation or pull heavy machinery off the counter surface. Implementing a smart-plug timer can also automate your machine’s morning warm-up cycle, saving electricity while ensuring your group head reaches stable operating temperature before you wake up.
Choosing the Right Core Equipment for Your Home Coffee and Espresso Station
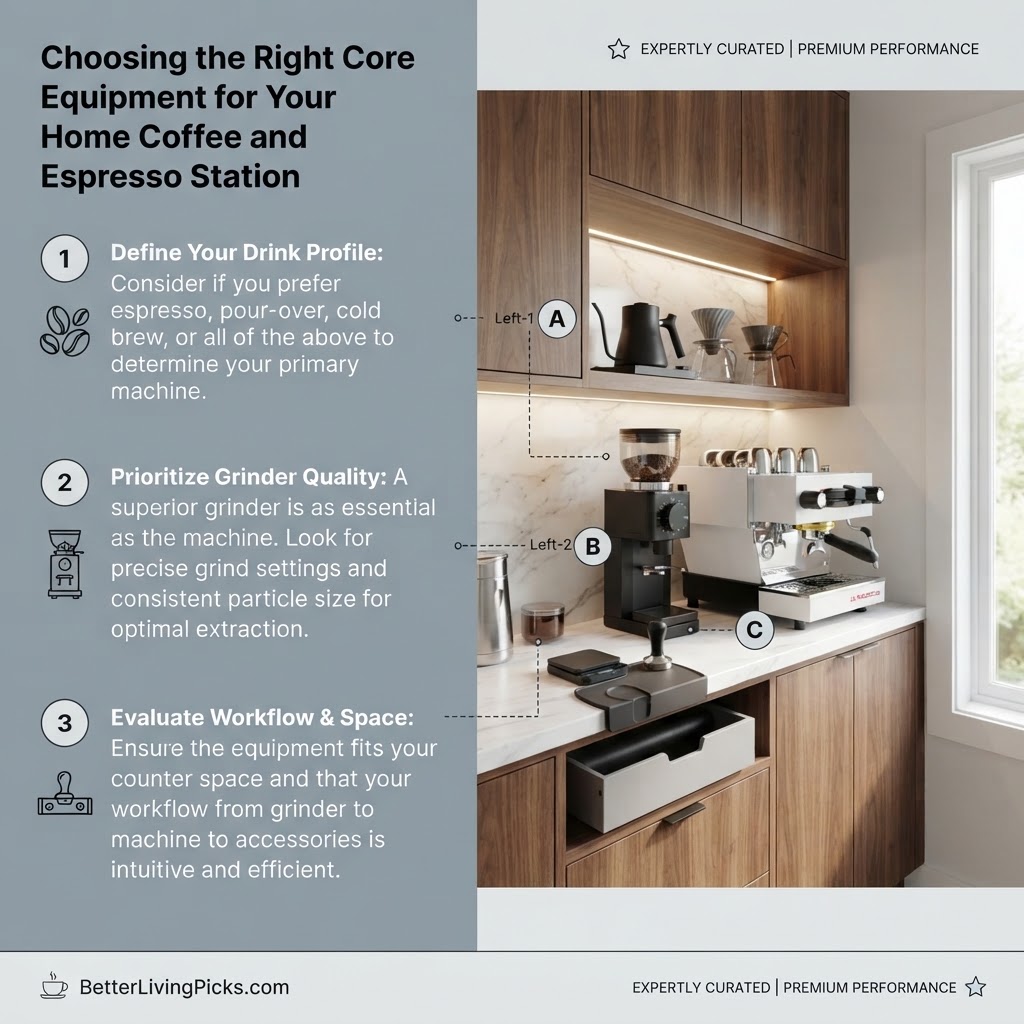
Manual Lever vs Semi-Automatic vs Super-Automatic Machines
Selecting the correct machine anchors the entire aesthetic and functional success of your station, determining your daily routine and ultimate skill ceiling. Manual lever machines offer ultimate tactile control over pre-infusion pressure curves and flow profiling, but they demand a steep learning curve, physical strength, and constant attention. Semi-automatic machines strike the ideal balance for home baristas by automating water temperature stability and pump pressure while leaving tamping pressure, dose weight, and shot timing entirely in your hands. Super-automatic variants handle everything from bean grinding to milk frothing at the push of a button, though they sacrifice manual customization, fine-tuning capacity, and long-term repairability. Evaluate your daily patience level, mechanical aptitude, and available budget before committing to a heavy brass boiler or a sleek compact appliance.
Choosing a machine with a PID temperature controller ensures your brew water remains rock-stable shot after shot, eliminating bitter temperature spikes common in older thermostat models. Considering whether you prefer milk-based drinks like lattes or straight espresso shots dictates whether you need a single boiler, heat exchanger, or dual boiler system. Investing in robust stainless steel construction guarantees your machine resists corrosion and handles daily commercial-grade demands without structural failure.
Why Burr Grinders Matter More Than Espresso Machines
Experienced coffee professionals universally agree that upgrading your grinder yields a dramatic, undeniable improvement in cup quality compared to upgrading your espresso machine. Blade grinders chop coffee beans unevenly, producing a chaotic mixture of ultra-fine dust and massive boulders that cause channeling, bitter over-extraction, and sour under-extraction simultaneously. Investing in a dedicated flat or conical burr grinder ensures uniform particle size distribution, which is essential for hitting that textbook honey-like espresso pour with rich crema. Look for micro-step adjustments or stepless collars so you can dial in your espresso grind size down to the micron as coffee beans age and weather humidity conditions shift throughout the seasons.
Pairing your machine with a low-retention grinder also ensures you do not waste stale grounds from yesterday’s dose into your fresh morning beverage. Keep your grinder close to the machine to minimize ground migration across your clean countertops and streamline your physical dosing motion. Maintaining clean burrs through periodic brushing and specialized tablet cleaning keeps your grind consistency sharp and prevents rancid oil buildup from tainting your fresh beans.
Optimizing Physical Ergonomics and Dosing Workflow
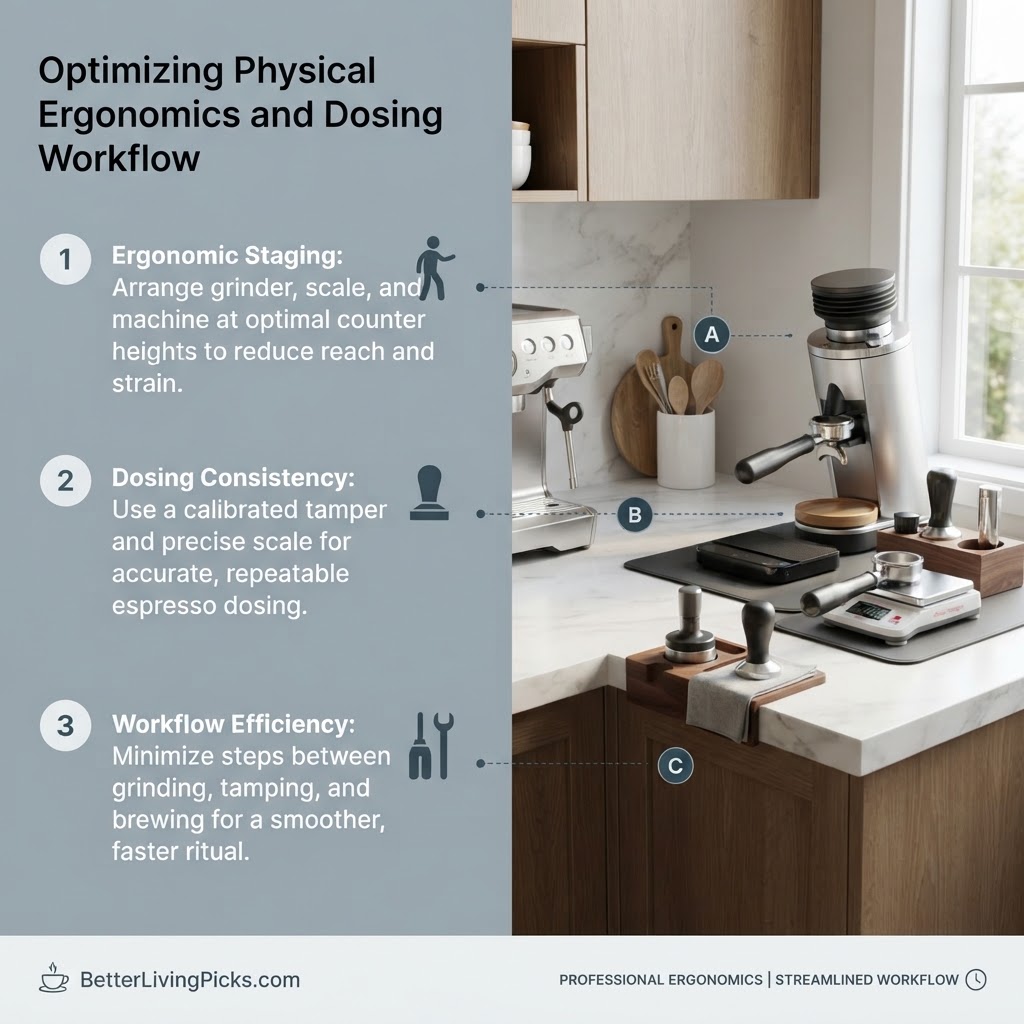
Mastering the Left-to-Right Grinder-to-Machine Triangle
An optimized espresso station organization layout follows an intuitive workflow triangle that mimics professional commercial cafe design principles. Place your bean storage and grinder on the far left, your espresso machine in the center, and your knock box or rinsing sink on the right. This left-to-right progression allows you to grind, dose, distribute, tamp, pull, and purge your portafilter without your hands crossing over each other awkwardly or wasting precious seconds. Minimizing physical motion reduces the likelihood of spilling loose grounds, bumping milk pitchers, or knocking over delicate glassware during peak morning grogginess. Take time to physically dry-run your workflow before screwing down any organizers or permanent shelf mounts. If a motion feels unnatural or requires reaching past hot steam wands, reconfigure your station layout immediately to protect your safety and speed.
Establishing a smooth physical rhythm turns the mechanical steps of coffee extraction into a seamless choreography that feels entirely natural. When every tool rests exactly where your hand expects to find it, your morning routine becomes a meditative pause rather than a frustrating scramble. Keeping your scale positioned directly on the drip tray beneath the group head allows you to weigh your output dynamically in real time.
Minimizing Physical Strain and Repetitive Tamping Fatigue
Applying consistent 30 pounds of downward pressure during tamping requires proper counter height and body alignment to protect your wrists and lower back from strain. If your station sits too high or too low, you will naturally compensate by putting awkward shearing stress on your wrist joints rather than pressing straight down. Adjusting your tamping mat to a comfortable vertical plane ensures your forearm remains completely vertical, maximizing leverage without physical discomfort. Using an ergonomic tamper with a contoured handle distributes pressure evenly across your palm, preventing localized bruising or repetitive motion fatigue over years of daily espresso preparation.
Taking micro-breaks to stretch your hands and shoulders during heavy weekend brewing sessions keeps your physical posture relaxed and focused. Designing a comfortable physical workspace ensures that crafting specialty coffee remains an absolute pleasure rather than a source of physical exhaustion.
Water Quality Management in Your Home Coffee and Espresso Station
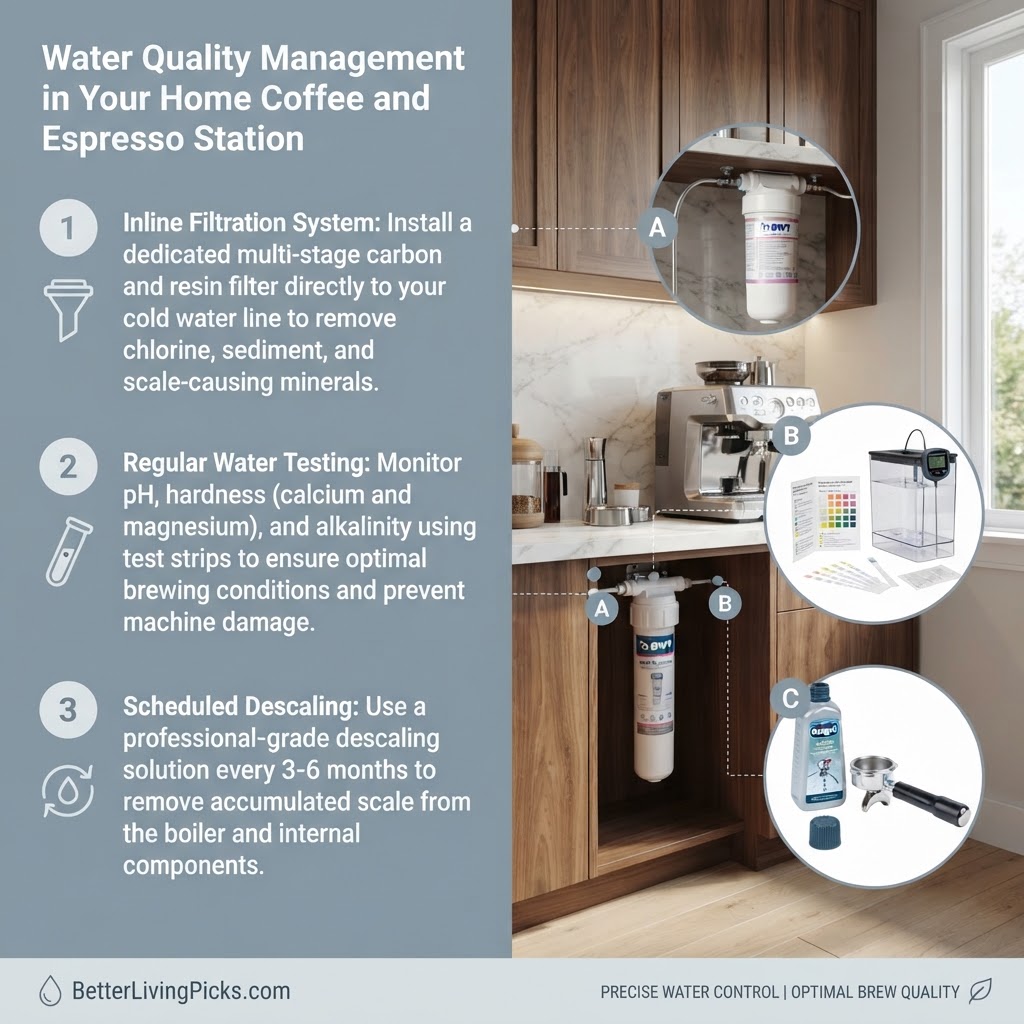
Avoiding Scale Buildup with Advanced Filtration Systems
Water quality makes up over ninety percent of an espresso shot, making your water management strategy a true cornerstone of station design. Relying on hard tap water filled with calcium and magnesium minerals will quickly scale up your boilers, ruining expensive heating elements within months of heavy use. Consider installing an inline reverse osmosis filtration system or keeping a dedicated reservoir pitcher filled with remineralized soft water right next to your machine. Mineral scale acts as a thermal insulator, destroying your machine’s temperature stability and causing catastrophic solenoid valve failures that require expensive professional repairs. Monitoring your filtration cartridge replacement schedule ensures your water purity never degrades silently over time.
Investing in a reliable water treatment setup protects your financial investment and guarantees that your coffee’s delicate flavor notes shine through without chemical distortion. Testing your water hardness regularly keeps you ahead of mineral scaling before it impacts your daily brewing performance.
Remineralization Techniques for Optimal Extraction Flavor
Pure distilled water lacks the mineral ions necessary to bond with coffee solubles, resulting in a flat, hollow, and under-extracted espresso taste profile. Adding precise amounts of magnesium and calcium back into pure water creates balanced buffer alkalinity that enhances fruity sweetness and body. Utilizing specialized mineral packets or custom buffer concentrates allows you to dial in your water chemistry down to exact parts per million specifications. Finding the sweet spot between scaling risk and flavor extraction elevates your home-brewed espresso to true specialty cafe standards.
Educating yourself on water chemistry transforms your understanding of how extraction variables interact beyond just coffee grind size and water temperature. Keeping your remineralized water securely stored in food-safe glass or stainless steel containers prevents plastic leaching and off-flavors.
Direct Plumbing and Gray Water Drainage Integrations
Assessing Under-Counter Plumbing and Leak Prevention
If you are building a custom home coffee and espresso station into a wet bar or kitchen island, plumbing a direct water line and a gray water drainage tube eliminates tank refills entirely. Direct drainage keeps your workflow uninterrupted, saving you from constantly walking back and forth to empty drip trays filled with milky wastewater. Always check local plumbing codes and install leak detection shut-off valves before attempting permanent under-counter drain modifications. Using braided stainless steel supply lines prevents accidental bursting and protects your cabinetry from catastrophic water damage.
Designing access ports for your plumbing lines keeps your countertop surface looking clean and professional without exposed ugly rubber tubing running everywhere. Regular visual inspections of under-counter connections catch minor weeping joints before they escalate into structural rot.
Eliminating Manual Reservoir Refills and Drip Tray Emptying
Connecting your machine directly to house water supply lines removes the tedious chore of monitoring water tank levels during peak entertaining hours. A plumbed rotary pump machine also operates noticeably quieter than standard vibratory pumps, creating a peaceful morning ambiance in your kitchen. Routing your drip tray drain directly into your home’s main waste pipe means you never have to carry a sloshing tray of brown water across the kitchen floor again. This commercial-grade upgrade streamlines high-volume espresso production, making it effortless to pull shots for large groups of family and friends.
Embracing direct plumbing transforms your kitchen corner into an authentic commercial-grade bar that handles heavy use without missing a beat. Careful initial installation ensures years of maintenance-free operation and ultimate convenience.
Advanced Storage Solutions for Specialty Coffee Beans
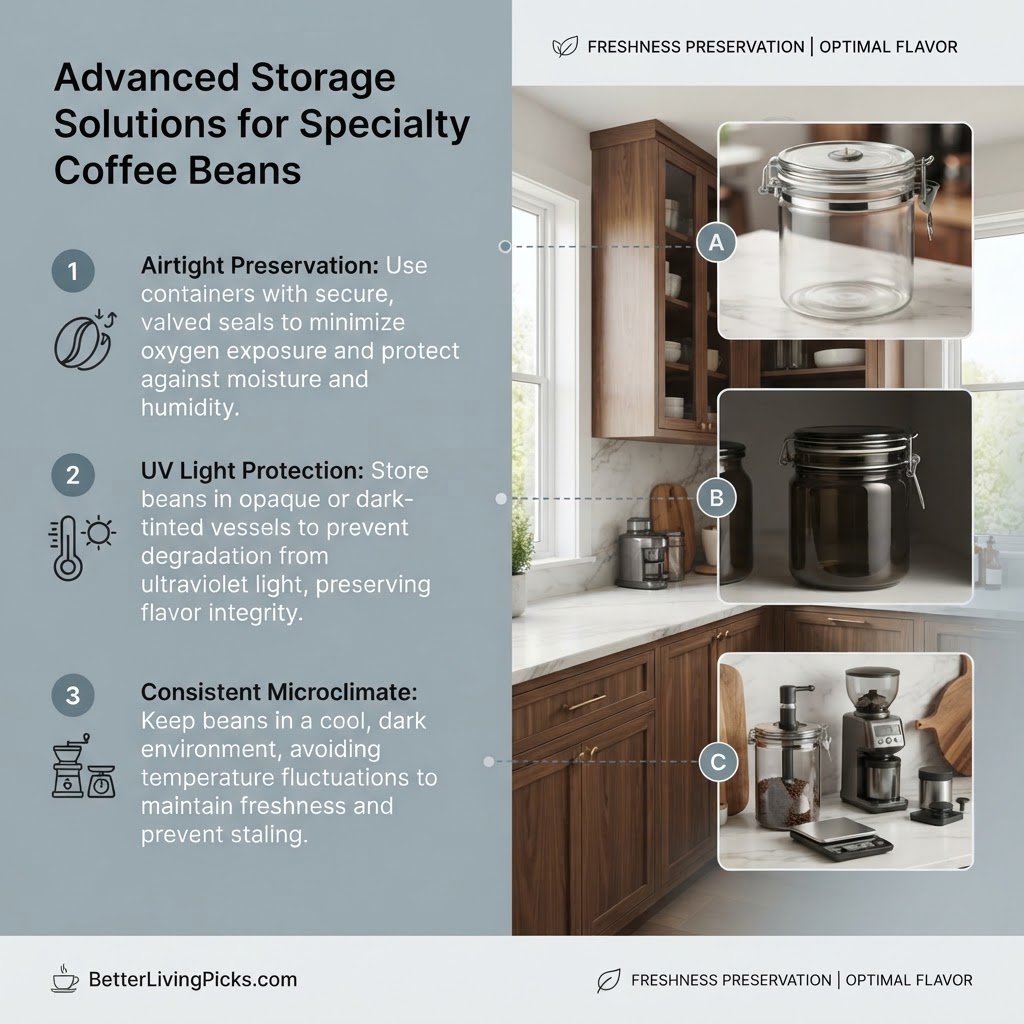
Protecting Volatile Aromatics from Light, Air, and Heat
Coffee beans are remarkably fragile agricultural ingredients that degrade rapidly when exposed to oxygen, light, heat, and ambient moisture. Storing your specialty roasts in clear glass jars on an open sunny shelf ruins flavor profiles within days through staling and UV breakdown. Investing in vacuum-sealed canisters or opaque one-way valve containers preserves volatile aromatic compounds, keeping your delicate single-origin beans fresh for weeks. Keeping your canisters away from the direct radiant heat of your espresso machine’s boilers prevents premature aging of your coffee beans.
Understanding the degradation timeline of roasted coffee helps you buy appropriate quantities that match your weekly consumption rate. Protecting your investment in high-end specialty roasters ensures every cup delivers the vibrant tasting notes intended by the producer.
Organizing Vacuum Canisters and Roast Date Tracking
Arrange your syrup bottles, dusting shakers, and honey jars on tiered lazy susans or narrow risers to maximize vertical space behind your machine. Keeping your flavor additions organized prevents counter clutter and ensures your favorite morning additives remain within arm’s reach. Label your bean canisters with roast dates using small masking tape strips so you always brew the freshest batches first. Tracking roast dates eliminates guesswork and ensures you let your light roasts rest adequately before pulling shots.
Maintaining an orderly rotation system guarantees you never lose track of older bags hiding at the back of your pantry shelves. Simple organization practices keep your countertop clean, efficient, and visually stunning.
Portafilter, Tamper, and Small Tool Management
Utilizing Magnetic Strips and Custom Wooden Tamping Blocks
A cluttered workspace breeds frustration, especially when you are hunting for a stray distribution tool or a missing blind basket while water drips from your group head. Wall-mounted magnetic strips or dedicated wooden station blocks keep your tampers, leveling tools, and cleaning brushes neatly aligned. Store your naked and spouted portafilters in a custom desktop cradle or slot them securely into heavy rubber grouping mats. Keeping small accessories off the flat counter surface also prevents coffee oils and fine powder from caking onto the bottoms of your tools.
Investing in custom wooden tool holders adds a touch of warm organic texture that complements modern stainless steel kitchen appliances beautifully. Keeping everything docked in its designated slot speeds up your workflow and eliminates misplaced gear.
Keeping Puck Screens, Distribution Tools, and Brushes Accessible
Designate a small ceramic dish or tray specifically for used puck screens, cleaning pins, and micro-fiber cloths. This intentional containment keeps your entire workstation looking pristine and professional day after day. Having your WDT needles and distribution tools standing upright in a heavy weighted base makes single-handed grabbing completely seamless. Keeping cleaning brushes hanging within arm’s reach encourages immediate post-shot dusting of your grinder chute and portafilter basket.
Thoughtful accessory management turns a chaotic collection of metal tools into a cohesive, highly efficient workstation ecosystem. Small habits like returning tools to their trays instantly maintain order throughout busy mornings.
Managing Syrups, Flavorings, and Additives Cleanly
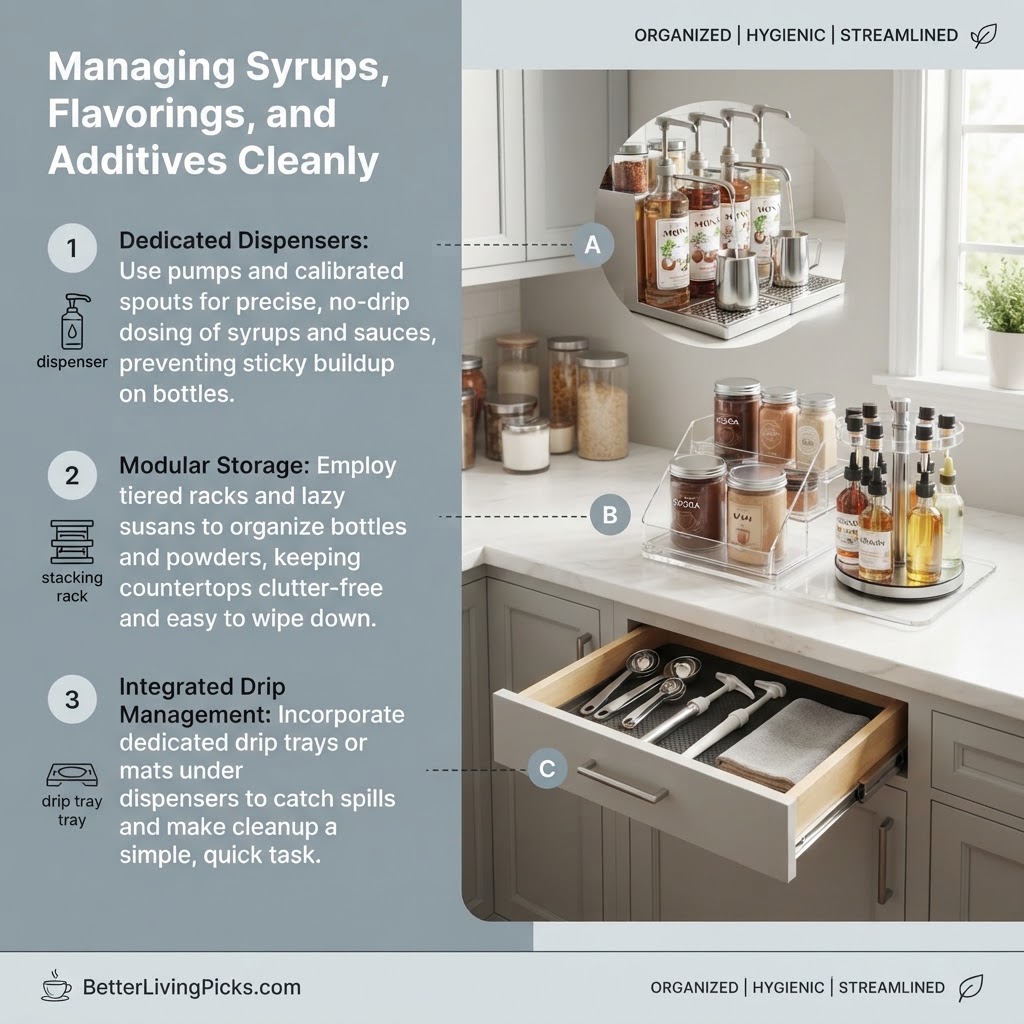
Utilizing Tiered Lazy Susans and Vertical Risers
Adding artisanal syrups, honey dispensers, and specialized cocoa shakers to your daily routine can quickly create a crowded countertop nightmare if left unorganized. Installing tiered lazy susans or narrow acrylic vertical risers allows you to stack your flavor bottles neatly behind your machine without blocking your reach. This vertical organization strategy ensures every bottle remains visible and accessible with a simple spin, eliminating the need to move multiple items to grab what you want. Choosing matching pump dispensers for your syrups also creates a uniform, upscale aesthetic that mimics your favorite local specialty cafe.
Keeping sticky syrup bottles contained on a dedicated silicone spill mat protects your wooden or laminate countertops from sugar rings and moisture damage. Wiping down your pump nozzles nightly prevents crystalized sugar buildup and sticky plunger mechanisms during your morning rush.
Preventing Sticky Residues and Countertop Clutter
Sugar-based additives attract dust and microscopic pests rapidly if allowed to pool around bottle bases or dispenser spouts. Establishing a quick weekly wipe-down routine with warm, soapy water keeps your condiment area hygienic and visually appealing. Using pump locks or silicone cap covers overnight stops fruit flies and dust particles from contaminating your favorite vanilla or caramel syrups. Grouping your sweeteners and flavorings in one defined zone prevents rogue bottles from wandering across your entire kitchen workspace.
Intentional boundaries for your flavoring station keep the primary espresso-making triangle clean and free from unnecessary distractions. A tidy condiment zone enhances the overall user experience for family members and visiting guests alike.
Controlling Wet Waste and Daily Cleanup Routines
Positioning Knock Boxes for Maximum Sanitation Efficiency
No matter how careful you are, coffee making is an inherently messy craft that generates loose grounds, stray milk drops, and wet pucks. Establishing a rigorous clean-up rhythm prevents sticky residue from hardening onto your stainless steel surfaces and surrounding walls. Positioning a sturdy knock box directly beside or beneath your grinder eliminates the messy trek across the kitchen to the main trash can. Choosing an in-counter knock box chute or a heavy-duty drawer knock box saves valuable surface area while handling high-volume daily puck disposal.
Emptying your knock box regularly and rinsing it out at the end of every week prevents mold growth and unpleasant odors in your kitchen environment. Keeping a small trash receptacle or compost bin directly underneath your station cabinet streamlines waste management during busy weekend mornings.
Immediate Steam Wand Purging and Microfiber Cloth Protocols
Wipe down your steam wand immediately after every single use with a damp microfiber cloth before milk proteins bake onto the hard hot metal. Always purge your steam wand with a short burst of steam both before and after frothing to clear out internal condensation and residual milk. Keeping a dedicated wet microfiber cloth folded on a side hook ensures you never scramble to find a rag while your milk pitcher cools. Washing your cleaning cloths daily in hot water without fabric softener maintains their grease-absorbing microfiber integrity.
A clean steam wand guarantees hygienic milk texturing and prevents burnt milk flavors from transferring into your next cappuccino. Prioritizing these micro-habits keeps your hardware looking factory-new for years.
Deep Internal Maintenance and Preventive Upkeep
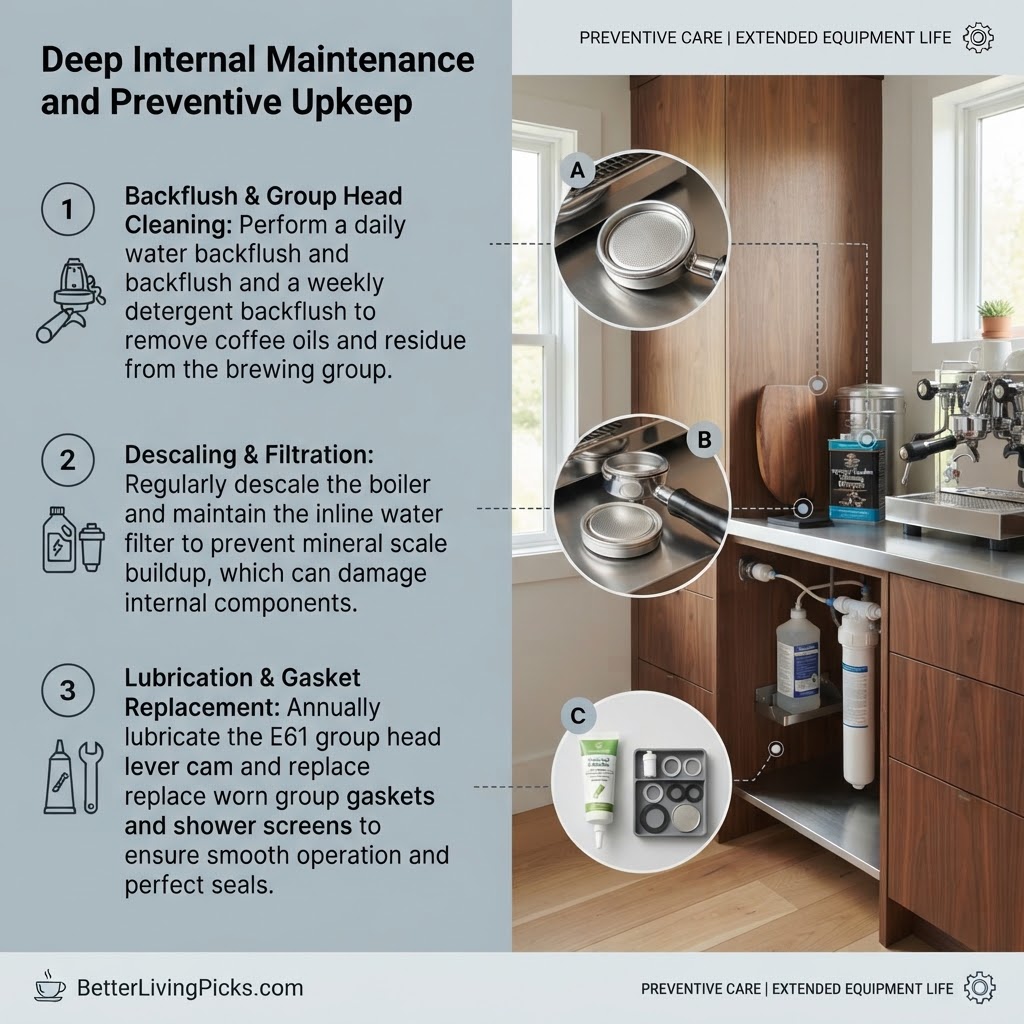
Weekly Group Head Backflushing with Commercial Detergents
Ignoring routine internal maintenance guarantees scale buildup, clogged solenoid valves, and bitter-tasting espresso shots over time. Backflushing your semi-automatic machine with a blind basket and food-safe detergent weekly strips away stubborn coffee oils trapped inside the group head. Running clean water backflushes immediately after the detergent cycle ensures no chemical residue lingers to contaminate your Monday morning espresso. Soaking your portafilter baskets and shower screens in a warm cleaning solution overnight dissolves stubborn oil layers completely.
Maintaining this cleaning discipline protects your internal valves from sticking and preserves the sweet, clean flavor profile of your favorite beans. Neglecting backflushing leads to rancid oil buildup that ruins even the highest-grade specialty roasts.
Scheduling Professional Boiler Descaling and Valve Overhauls
Performing a complete descaling cycle every two to three months removes calcium and magnesium deposits from your internal boilers and copper tubing. Keep a dedicated logbook or set calendar reminders on your smartphone to track your cleaning intervals accurately and prevent missed maintenance windows. Taking proactive care of your internal plumbing extends the lifespan of your machine by years and protects your financial investment. Knowing when to call a professional technician for group head gasket replacements and pump rebuilds prevents sudden catastrophic breakdowns.
Proactive maintenance ensures every single cup tastes as clean and vibrant as the day you unboxed your gear. A well-maintained machine delivers consistent thermal stability and reliable extraction pressure.
- Workflow Layout: Arrange your grinder, machine, and knock box in a logical left-to-right progression to eliminate awkward crossing movements.
- Grinder Priority: Invest in a high-quality burr grinder before upgrading your espresso machine to guarantee maximum particle uniformity.
- Electrical Safety: Plug high-draw heating appliances directly into grounded wall receptacles to protect internal fuses and prevent tripped breakers.
- Active Maintenance: Maintain a strict schedule of weekly backflushing and periodic descaling to preserve flavor clarity and equipment longevity.
Frequently Asked Questions
What is the ideal counter height for a coffee and espresso station?
The ideal counter height sits between 36 and 38 inches from the floor, which matches standard kitchen cabinetry. This height allows you to apply downward tamping pressure comfortably without straining your lower back or shoulders.
How often should I calibrate my espresso grinder?
You should check and adjust your grind size every time you open a new bag of coffee beans. Changes in bean age, humidity, and roast profile mean your burrs require constant minor tweaks to maintain a balanced extraction.
Can I set up a coffee station without direct access to a sink?
Yes, many home baristas operate successfully without direct plumbing by using a large jug of filtered water and a portable bucket for waste disposal. Emptying your drip tray manually takes minimal effort if your routine accounts for it.
Why does my espresso taste sour and pull too fast?
A sour, fast-flowing shot usually indicates that your coffee grind is too coarse, allowing water to channel through the puck too quickly. Tighten your grinder burrs closer together to increase extraction resistance and balance the flavor profile.
How do I prevent milk from burning onto my steam wand?
Always purge your steam wand with a quick burst of steam before and after frothing to clear out condensation and residual milk. Wipe the wand immediately with a dedicated damp cloth while the metal is still warm.
Is it necessary to use filtered water for espresso machines?
Using filtered water is essential because hard tap water deposits mineral scale inside narrow copper boilers and heating elements. Mineral buildup reduces thermal stability and eventually ruins the internal components of expensive machines.
What is the difference between a single boiler and a dual boiler machine?
A single boiler machine shares one heating vessel for both brewing and steaming, requiring you to wait for temperature switches between tasks. A dual boiler machine features separate dedicated boilers, allowing you to brew espresso and steam milk simultaneously.
How do I clean stubborn coffee oils out of my portafilter basket?
Soaking your portafilter baskets in a warm water bath mixed with specialized espresso machine cleaning powder overnight dissolves baked-on oils completely. Rinse thoroughly with clean water before your next brewing session to remove any chemical residue.
How much clearance do I need above my espresso machine?
You need at least 18 to 24 inches of vertical clearance between your countertop and upper wall cabinets. This space ensures you can easily lift the water reservoir lid or access top-loading bean hoppers without scraping cabinetry.
Can I store my coffee beans in the refrigerator?
Storing roasted coffee beans in the refrigerator is strongly discouraged because fluctuating temperatures introduce condensation and moisture. Condensation ruins the delicate volatile oils and accelerates staling, ruining the flavor of your espresso.
How do I choose the right tamper size for my portafilter?
You must measure the inner diameter of your portafilter basket precisely, as standard sizes typically range from 54mm to 58mm. Buying a tamper that matches your exact millimeter specification prevents loose grounds from escaping un-tamped along the basket walls.
Crafting Your Perfect Daily Ritual
Building an intentional home coffee and espresso station changes your entire morning landscape into something truly rewarding. When you balance your layout ergonomics, prioritize quality grinder performance, and maintain a clean workflow, pulling cafe-quality shots at home becomes second nature. Embrace the learning process, experiment with new roasts, and enjoy every single step of your daily brewing journey.