

Mount your rod 4 to 6 inches above the window frame, or split the distance between the top of the frame and the ceiling for a soaring high-ceiling effect that maximizes vertical space.
2. Should the curtains touch the floor?
For a polished, high-end look, your curtains should just graze the floor or “kiss” it. Avoid leaving a large gap, as this cuts off the visual vertical line you’ve worked to create.
3. How wide should the rod extend?
Extend your rod 8 to 12 inches wider on each side of the window frame. This keeps the fabric from blocking light and makes the window look significantly larger and wider.
4. What if I have crown molding?
If you have crown molding, mount the rod just below the molding. This maintains the height while preventing damage to your trim and keeping the curtain hardware from looking cluttered or cramped.
Most people make one massive mistake when hanging curtains: they mount the rod right above the window frame. It feels like the “safe” place to drill, but it effectively chops your wall in half and makes your ceiling feel lower than it actually is. It’s a quick way to shrink a room’s visual footprint, making even spacious areas feel boxy and closed-in. By ignoring the empty vertical wall space above the trim, you are essentially leaving money on the table, or rather, style on the table.
The secret to a high-end, designer look isn’t in buying expensive window treatments, but in the strategic placement of the hardware. By moving the rod significantly higher than the window frame, you draw the eye upward and create the illusion of soaring architecture. It’s the easiest DIY trick to change the entire energy of a room without touching a single paint can. In this guide, we’ll dive deep into the specific measurements, architectural workarounds, and professional techniques required to master this look, ensuring your windows look purposeful, intentional, and perfectly proportioned.
The Golden Rule: Going High and Wide
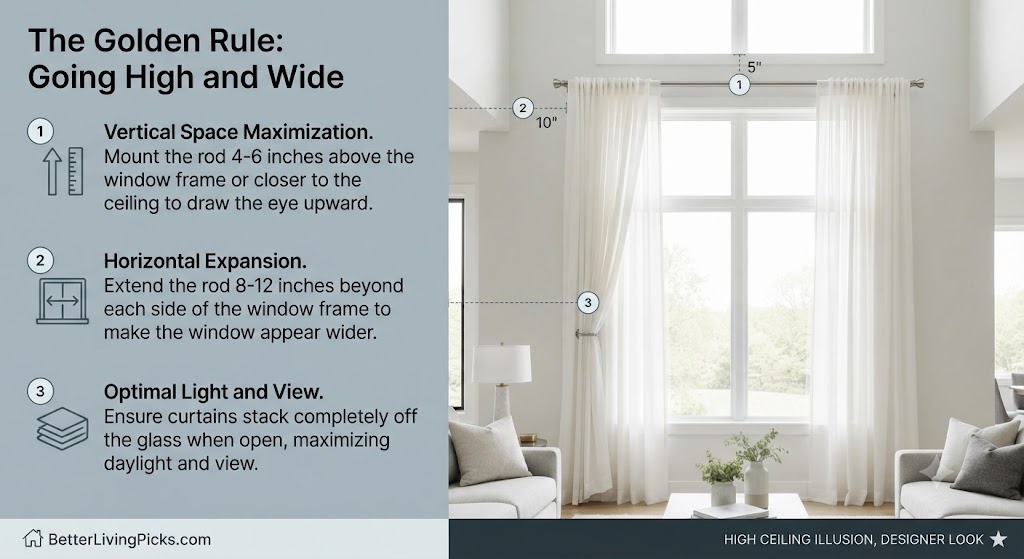
If you want your room to look like a page out of a magazine, you have to ignore the window frame entirely. The frame is just a structural element; it shouldn’t dictate your style. By hanging your rod closer to the ceiling, you force the eye to track the full height of the wall. This trick is the foundation of high-ceiling illusions.
Why the “Near-Ceiling” Approach Works
When you hang curtains high, you create a seamless vertical line. This tricks the brain into perceiving the wall as taller than it is. If you stop at the frame, your eye stops at the frame. When you go high, the eye continues until it hits the ceiling. It creates a cleaner, more intentional aesthetic that defines the whole room. This is especially effective in rooms with standard 8-foot ceilings, where adding those extra few inches of height makes a massive difference in perceived volume.
Common Mistakes to Avoid
- The “Gap Trap”: Leaving too much wall space between the ceiling and the rod is fine, but leaving the rod too close to the window frame is a common mistake that keeps the ceiling feeling low.
- The “Shrinking” Effect: If you hang the rod too narrow, your window looks like a dark, isolated hole on the wall. Always extend your rod well past the frame so the curtains stack off the glass when open.
- The “Shorty” Look: Don’t buy curtains that end at the window sill or just a few inches below it. Short curtains are the quickest way to make a room feel cheap, choppy, and unfinished.
The “Width” Factor
Width matters just as much as height. If you want a window to look substantial, you need to provide room for the fabric to sit on the wall, not the glass. Aim for 8 to 12 inches of overhang on each side. This allows you to pull the curtains back far enough to clear the entire glass pane, maximizing natural light, which also makes the room feel larger and more open.
Measuring for Success: Precision Matters
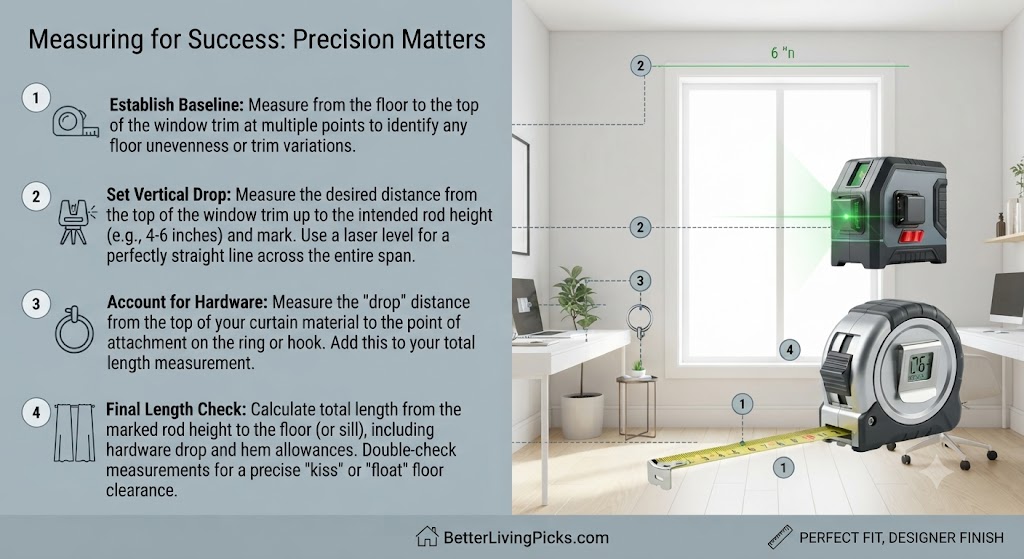
Measuring is the step where most people get lazy, and it’s where they get caught. You cannot guess these measurements. If you are off by even an inch, the curtains won’t hang right, or they won’t touch the floor the way they should.
Account for the Floor Clearance
Decide on your “look” before you drill.
- The Kiss: The fabric just touches the floor. This is the gold standard for a modern, clean look. It looks professional and keeps the curtains from looking like they shrunk in the wash.
- The Float: About 1/2 inch off the floor. This is practical if you have uneven floors or pets who hate fabric dragging on the ground.
- The Puddle: An extra 2-3 inches of fabric on the floor. This is a very formal, romantic, and luxurious look, but be aware that it can be a magnet for dust and a nightmare to vacuum around.
Don’t Forget Hardware Drop
Remember that your rings or grommets have a specific “drop” distance. If you use clip-on rings, the rod sits lower than the top of the curtain fabric. Measure from the spot where the curtain actually connects to the ring, then add that distance to your total length requirement. This calculation is vital; forgetting it is how you end up with “floating” curtains that look like they are hovering inches above the floor.
Essential Tools
- Laser Level: Don’t trust a standard bubble level on a long span. A laser level is worth every penny for getting that perfect, long, dead-straight line across the wall.
- Stud Finder: Never skip this. Don’t risk pulling your rod out of the drywall. If you can’t hit a stud, use high-quality toggle bolts or anchors specifically designed for heavy-duty window treatments.
- Tape Measure: Measure twice, drill once. Check your floor-to-rod distance at both ends of the window to ensure the rod is truly parallel to the floor, even if your floor is slightly slanted.
Handling Tricky Architecture
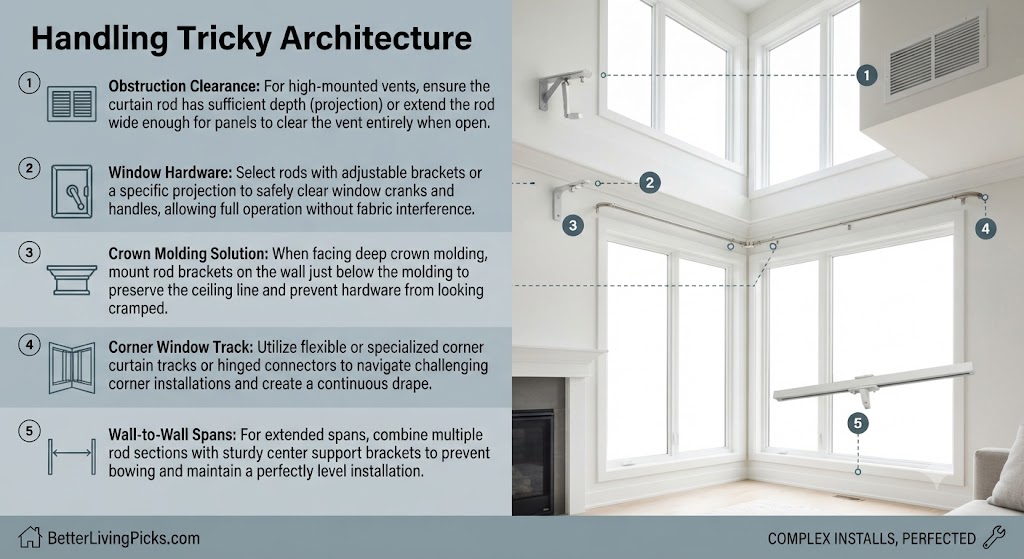
Not every home is a blank slate. You’ll run into vents, molding, and weird corners. Don’t panic. These are design problems with standard solutions.
Working Around Crown Molding
If your crown molding is thick, you might be tempted to mount the rod on the molding itself. Don’t. It’s hard to secure and often looks clunky. Instead, mount the brackets on the wall directly beneath the molding. You want the curtains to feel like they are “dropping” from the ceiling line, even if they aren’t actually bolted into the wood trim.
Window Cranks and Vents
If you have a window crank, make sure your rod has enough projection (depth) to clear the handle. If you have an air vent located above the window, you have two choices: mount the rod lower, or extend the rod wider so the curtains hang to the side of the vent. Never block your airflow; it’s bad for your HVAC system, and your curtains will move in a distracting way when the air is on.
Corner and Wall-to-Wall Installations
If you have a corner window or just want a floor-to-ceiling wall of fabric, use a ceiling-mounted track system instead of a rod. These are much more forgiving in tight corners and offer that ultra-modern, seamless look that makes a ceiling feel infinite. For corner windows, bypass brackets are your best friend; they allow the curtain to slide past the bracket, giving you a continuous sweep of fabric.
Pro Tips for a Finished Look
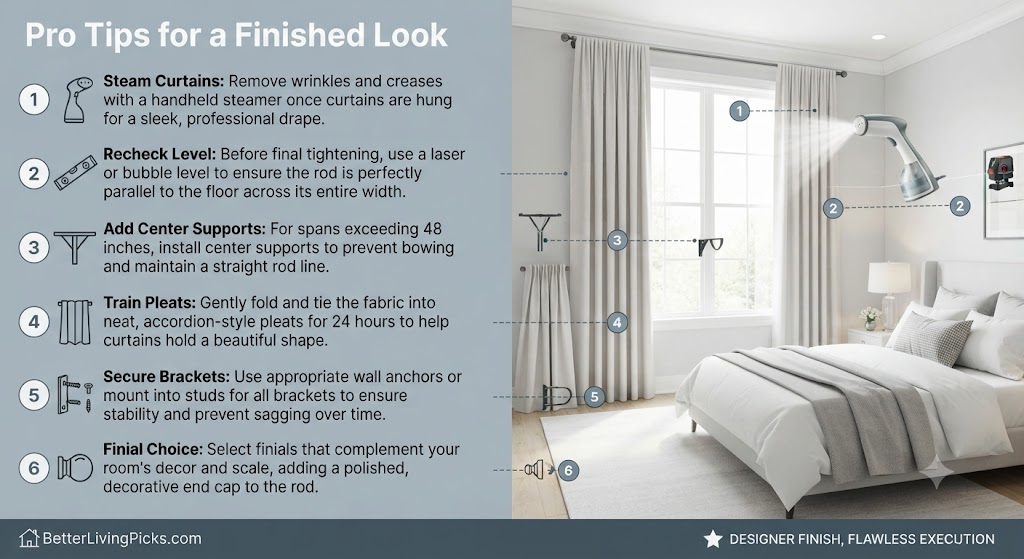
You’ve got the height, you’ve got the width, but it still doesn’t look quite right? It’s probably the drape and the quality of the hardware.
Steam-Treating is Non-Negotiable
Fabric comes out of the package wrinkled. Those wrinkles catch light and ruin the clean lines you’ve worked so hard to build. Use a garment steamer once the curtains are hung. This relaxes the synthetic or natural fibers and allows the folds to fall into perfect, vertical pleats. Do this slowly, working from the top down, and you will see the curtains instantly look five times more expensive.
Weight and Distribution
If you are hanging heavy, blackout-lined curtains, your middle bracket is not optional. It’s essential. A long, heavy rod will bow in the middle if you don’t support it. That bow kills your perfectly level line and makes the whole installation look like a DIY failure. If your span is over 48 inches, always include a center support bracket.
Bracket Depth and Projection
Think about the depth of your window trim. If your curtains hit the trim on the way down, they won’t hang straight. Check your bracket projection to ensure the fabric hangs free and clear of any molding or frame obstructions. A curtain that is forced to flare out because it’s hitting the window handle looks cluttered and unkempt.
Selecting the Right Curtain Hardware
Don’t cheap out on the hardware. Lightweight plastic brackets will bend under the weight of even medium-weight fabric. Look for steel or thick aluminum brackets. If you are doing a floor-to-ceiling look, consider a double rod system, this allows you to layer a sheer inner curtain for privacy and a heavy outer curtain for light blocking, which adds immense visual depth to the room.
Frequently Asked Questions
Is it okay to hang the rod directly on the ceiling?
Yes, it is more than okay. Ceiling-mounted tracks are a popular designer choice, especially in modern homes or rooms with very low clearance above the window frame. It creates the most dramatic vertical line possible and is fantastic for making a space feel taller.
What if my curtains are too short for the new height?
If you’ve already bought curtains and they are too short to reach the floor from your new, higher rod position, don’t hang them high. You are better off hanging them at the correct height for their length and accepting the lower visual profile. Short curtains are the biggest “don’t” in interior design; it is always better to have them touch the floor.
Should I use a double rod for layering?
A double rod is a great idea if you want a sheer curtain for privacy and a blackout curtain for light control. Just make sure your brackets are strong enough to support the extra weight. Always mount the inner rod for the sheers and the outer rod for the heavier fabric, and ensure the outer rod has enough projection to clear the inner layer.
How do I hide the gap if the rod is high but the window is small?
The fabric itself is your best tool here. If the rod is high and the window is small, use wide panels that cover the wall space on both sides of the window. This makes it look like there is a much larger window behind the fabric, hiding the fact that the actual glass is small.
Are grommet-top curtains okay for high mounting?
Grommet-top curtains can be used, but they are often difficult to get a “perfect” look with when mounted very high because the header tends to flip up. If you are going for a very high, tailored look, pleated curtains with ring-clips or a track system often provide a much cleaner, more professional drape.
Do I really need wall anchors?
Unless you are lucky enough to be drilling into wood studs for every single bracket, you absolutely need wall anchors. Curtain rods are subject to constant pulling and sliding, which will loosen standard screws in drywall within a week. Use heavy-duty toggle anchors for a permanent, secure hold.
Final Thoughts on Elevating Your Space
Transforming your space doesn’t have to cost a fortune. By adjusting where you hang your curtain rods, you are playing with the geometry of your room, tricking the eye into seeing more height and more space than is actually there. It’s a simple change, but once you do it, you’ll never look at a window the same way again.
Don’t be afraid to take your time with the planning phase. Most of the frustration in home DIY comes from rushing the measurements. If you take the time to map out your rod position, double-check your clearance, and ensure your hardware is properly anchored, the result will be a room that feels taller, brighter, and significantly more polished. Grab your laser level, lean into those high-mounting heights, and enjoy the new, elevated look of your home.

